
.png "Build Your Own DIY Kalimba")

Build Your Own DIY Kalimba: A Beginner's Guide to Crafting This Beautiful Instrument
The kalimba, also known as the thumb piano,is one of the most accessible and melodically enchanting instruments in the world. With its gentle, resonant tones and compact size, it has captured the hearts of musicians and hobbyists alike. The good news? You can build one yourself with minimal tools and materials.
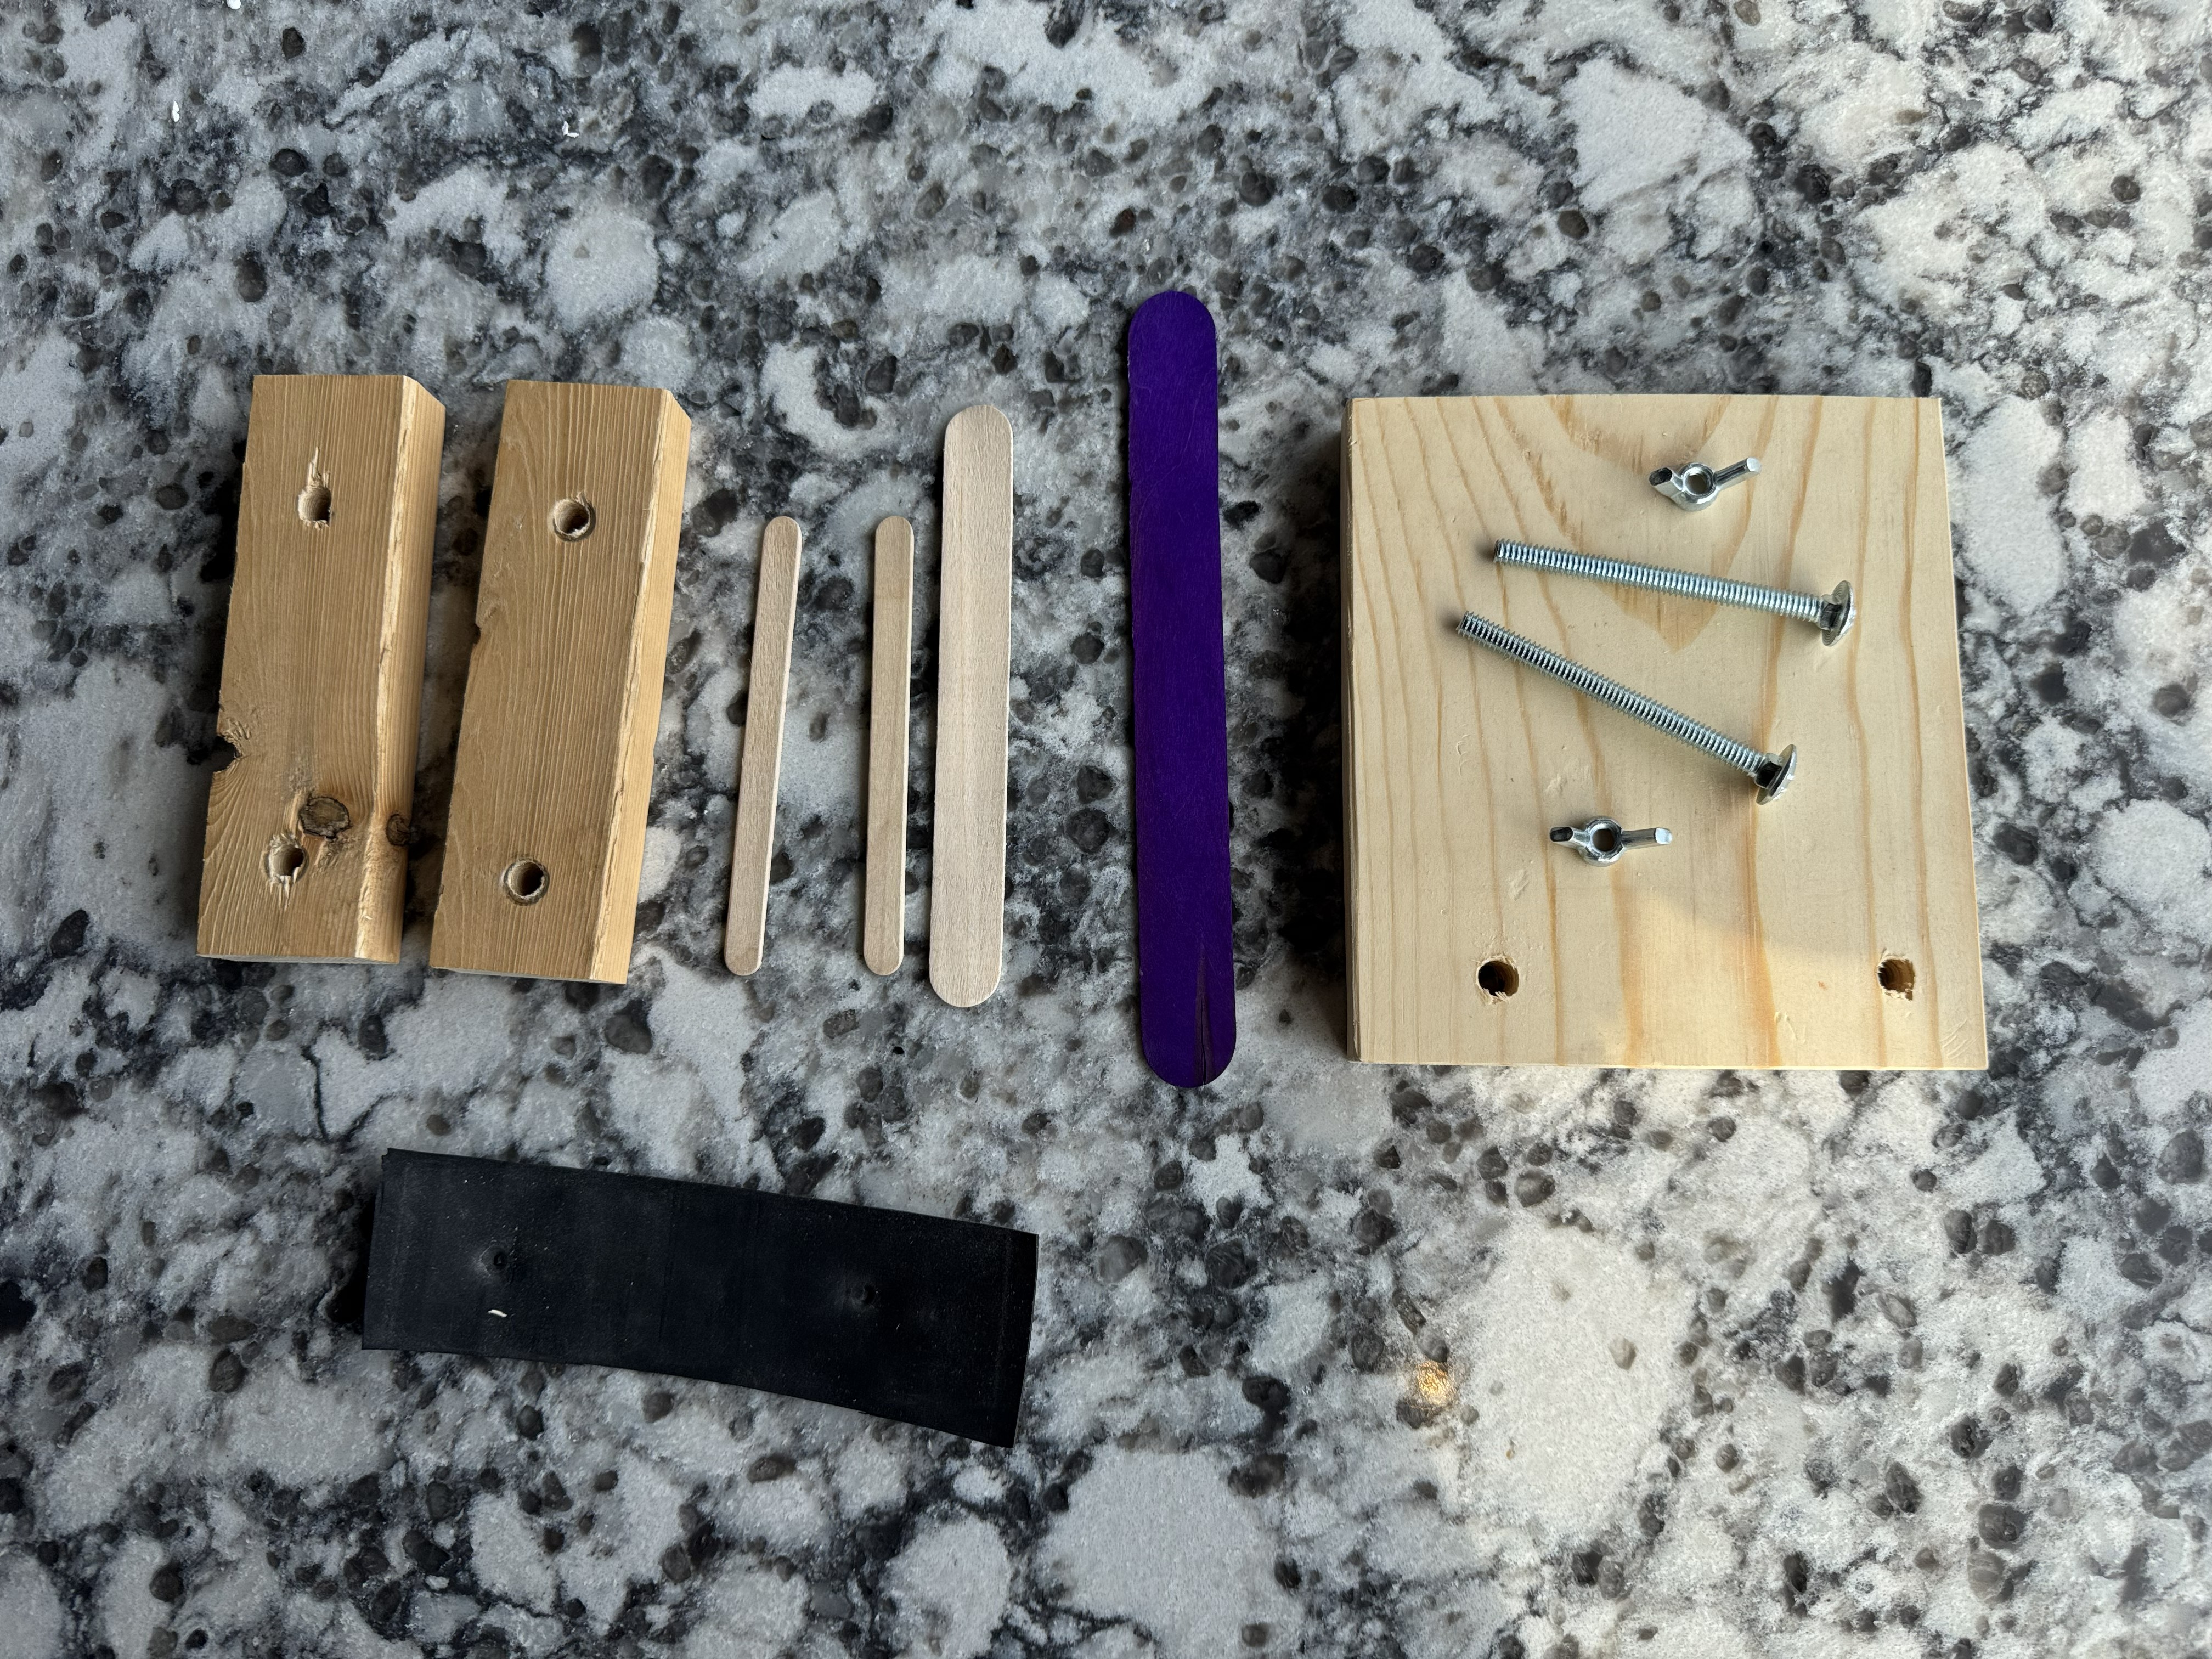
What You'll Need
Before getting started, gather the following materials:
- Pieces A: (2) 1 in. x 2 in. x 5-1/2 in. Wood Pieces
- Piece B: (1) 1 in. x 6 in. x 6 in. Wood Piece
- (2) Small Popsicle Sticks
- (1) Medium Popsicle Sticks
- (1) Large Popsicle Sticks
- (1) 5-1/5 in. Rubber Strip
- (2) 3-1/2 in. Carriage Bolts
- (2) Wing Nuts
Step-by-Step Instructions
Step 1: Insert the Carriage Bolts into the Base
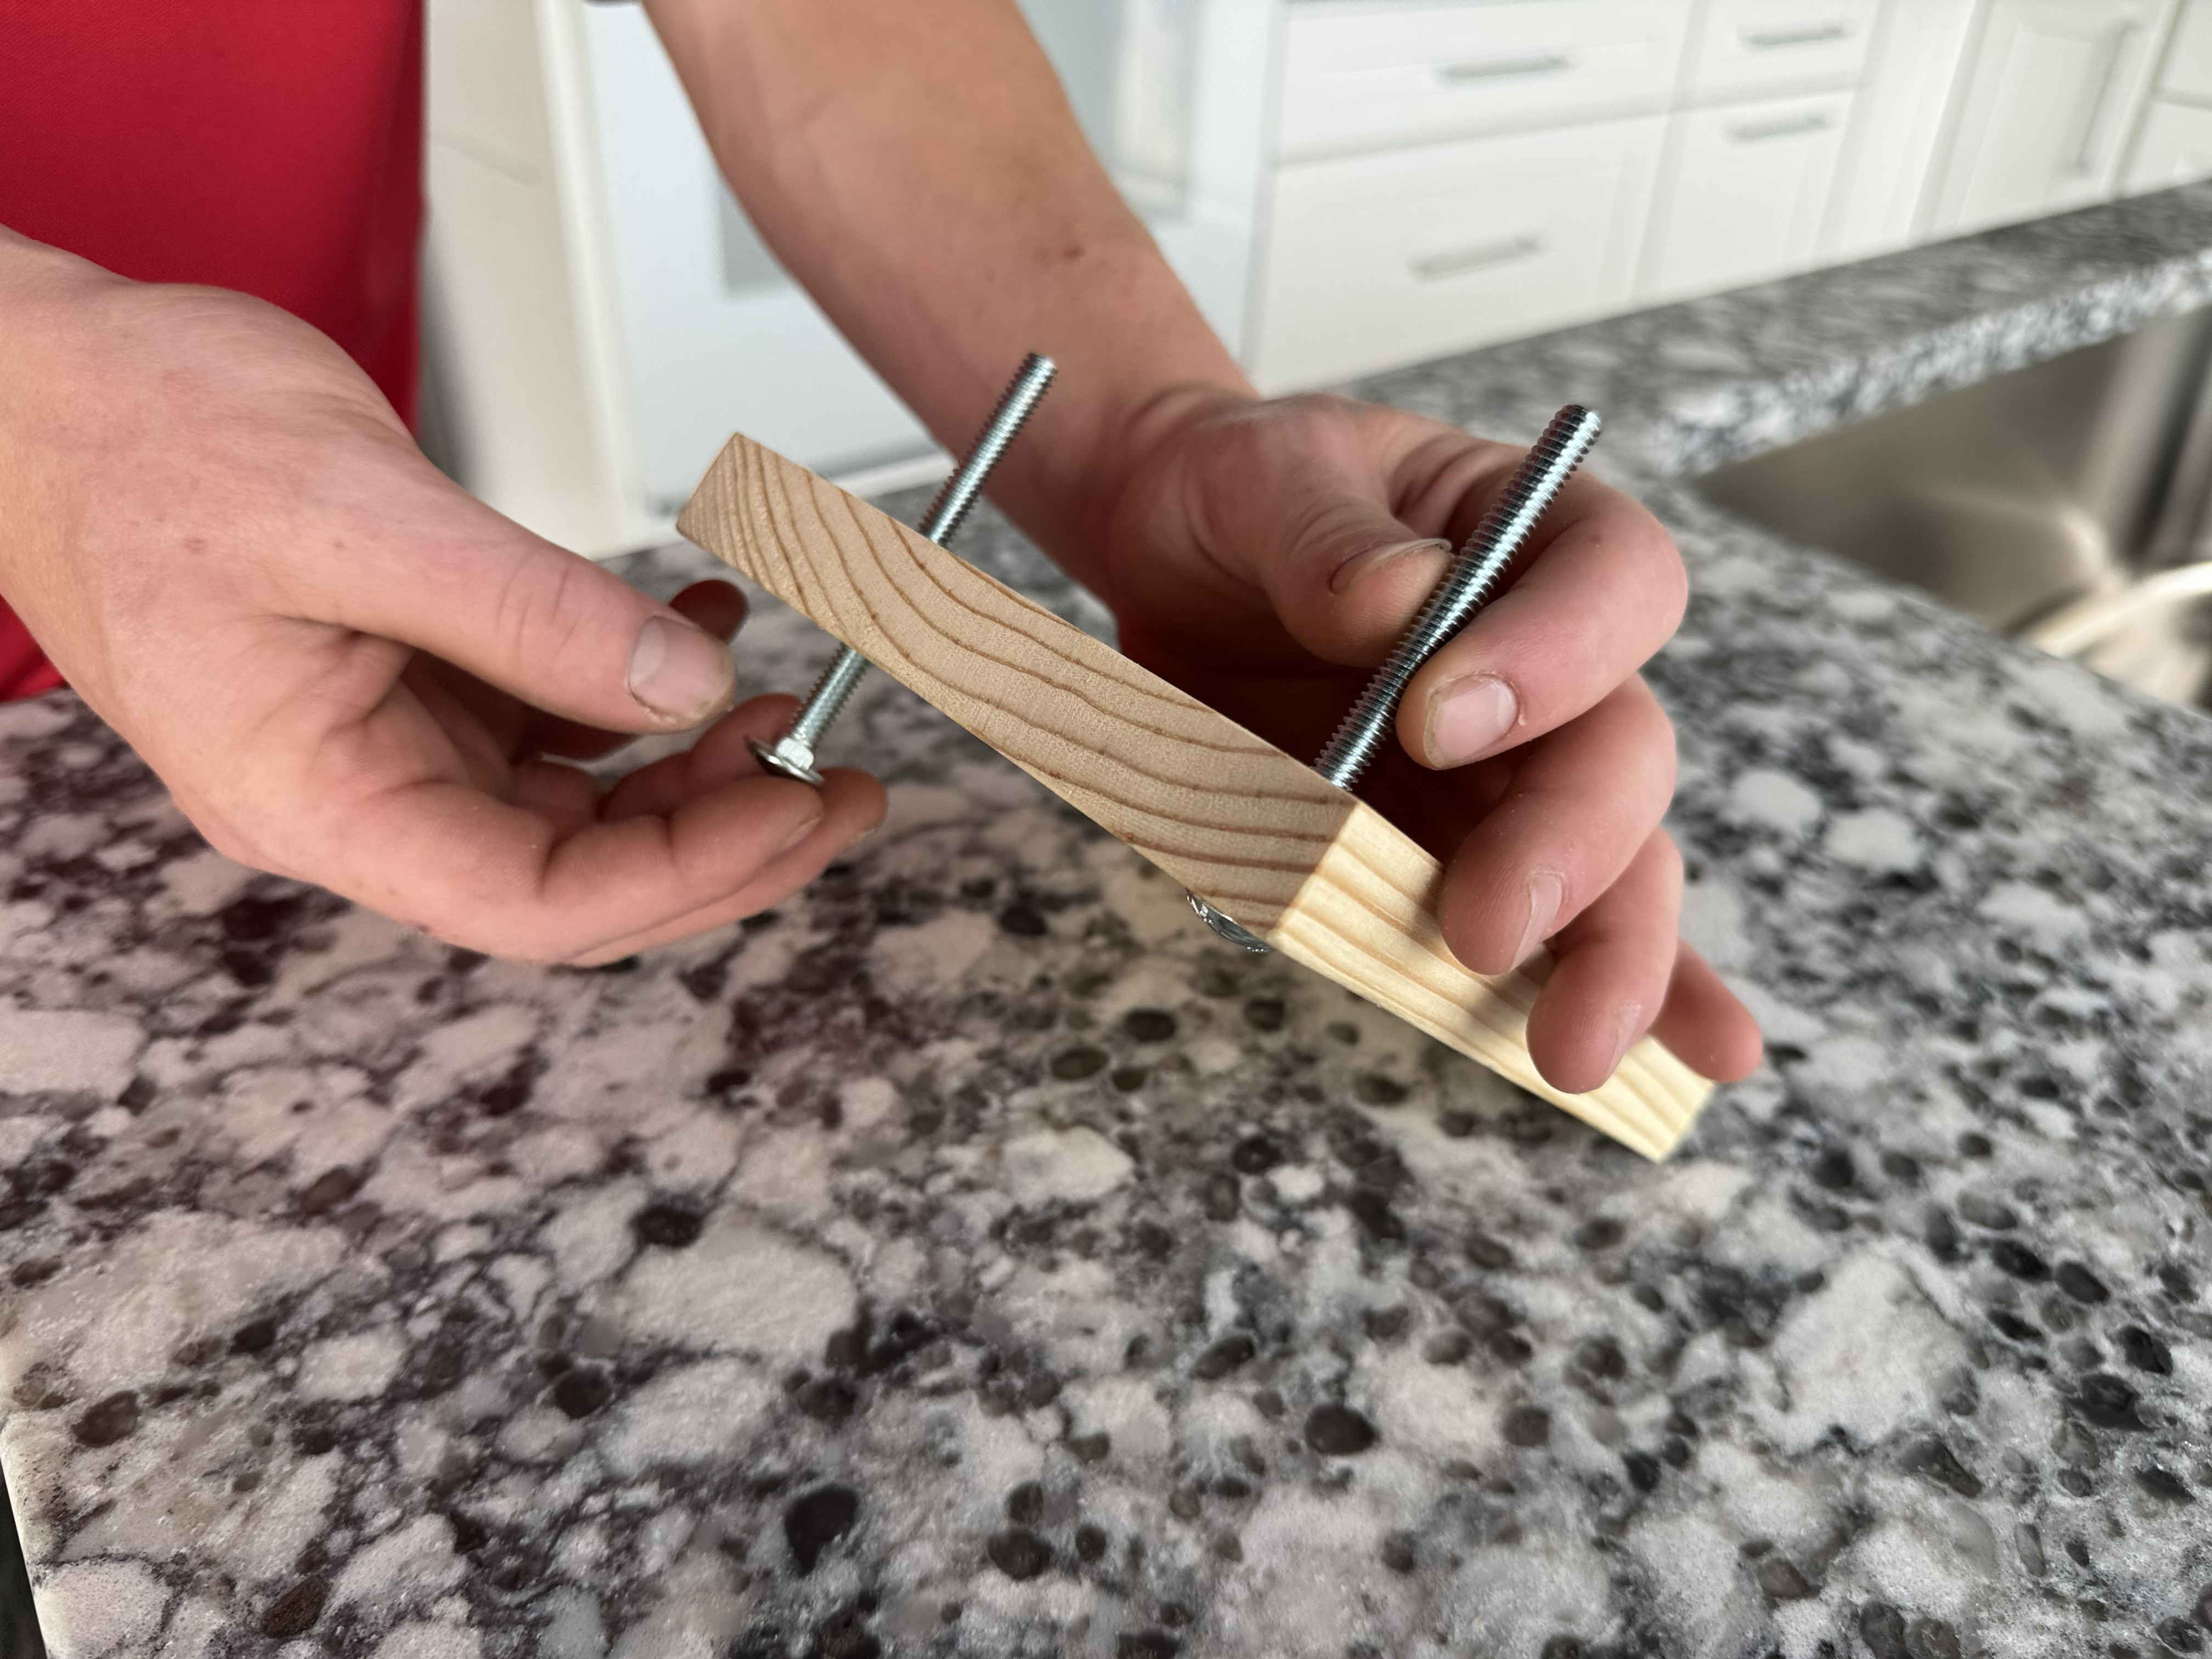
Start with Piece B, the 6 inch by 6 inch wood base. Insert both carriage bolts into the predrilled holes on Piece B. Push the bolts all the way through so they stand upright and secure in the base.
Step 2: Install the First Support Piece
Take one Piece A and slide it onto the carriage bolts using the predrilled holes. Make sure the edges of Piece A line up evenly with the sides of Piece B so everything sits flush and straight.
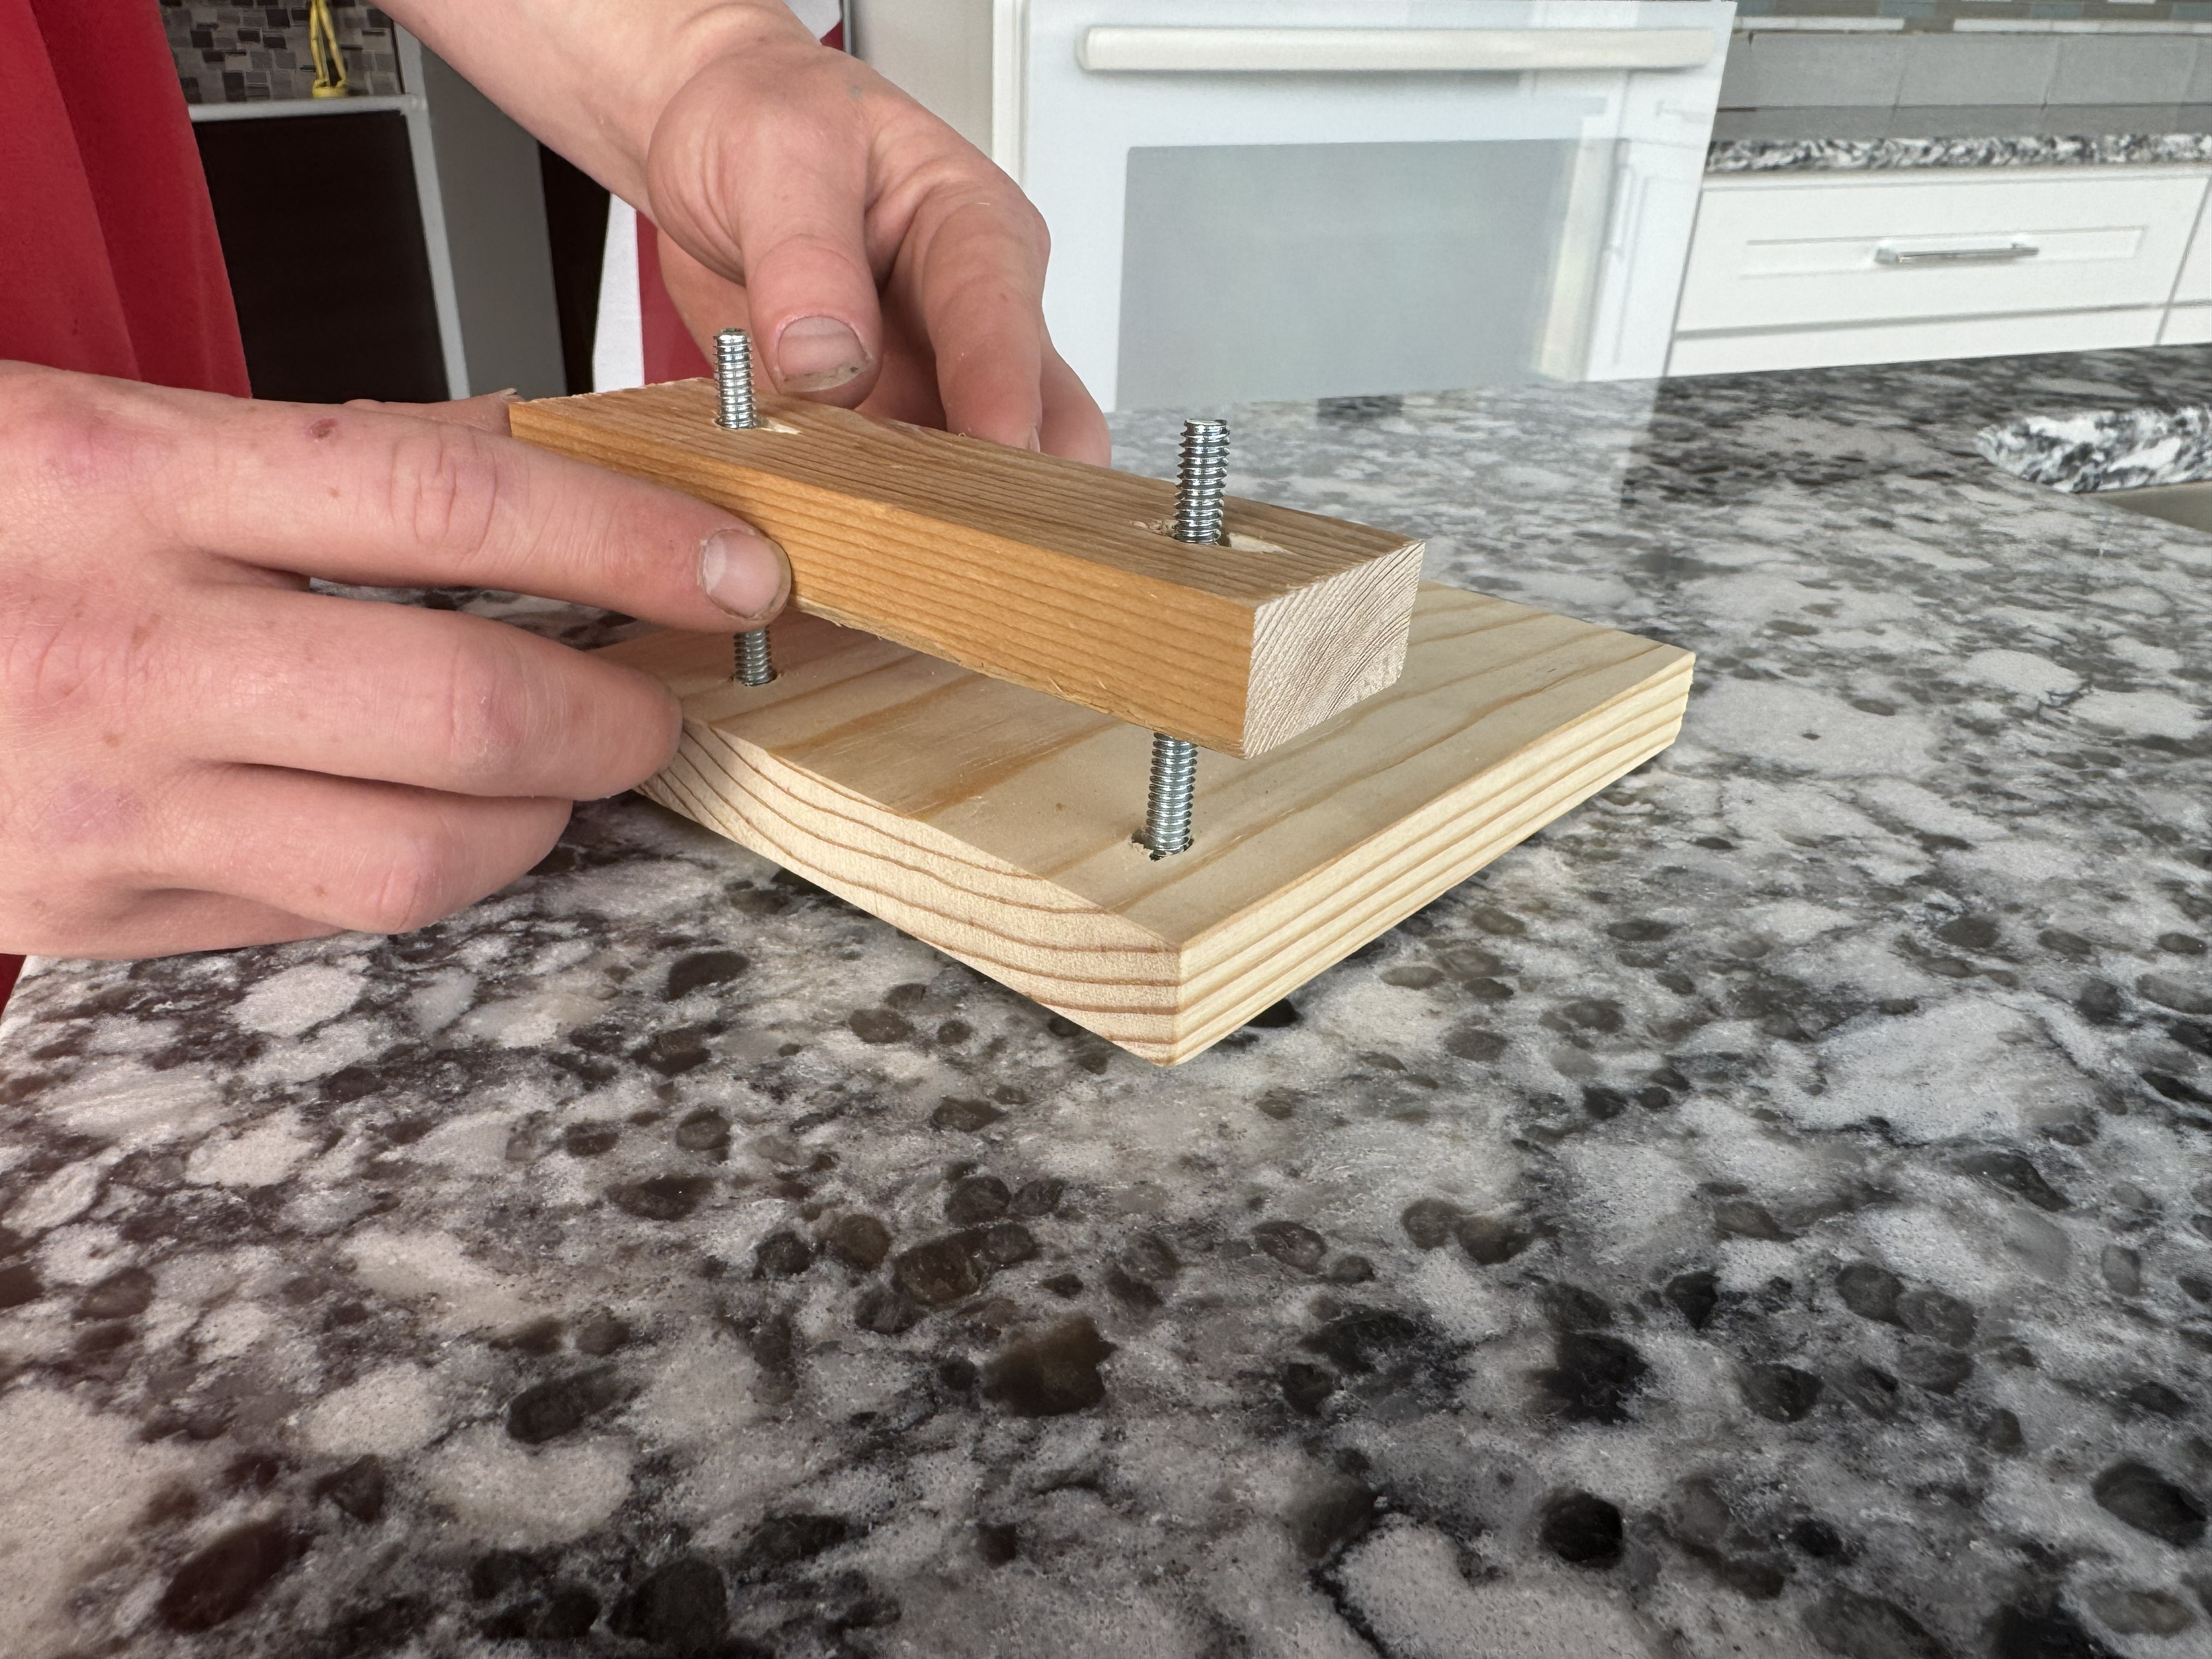
Step 3: Add the Rubber Strip and Second Support Piece
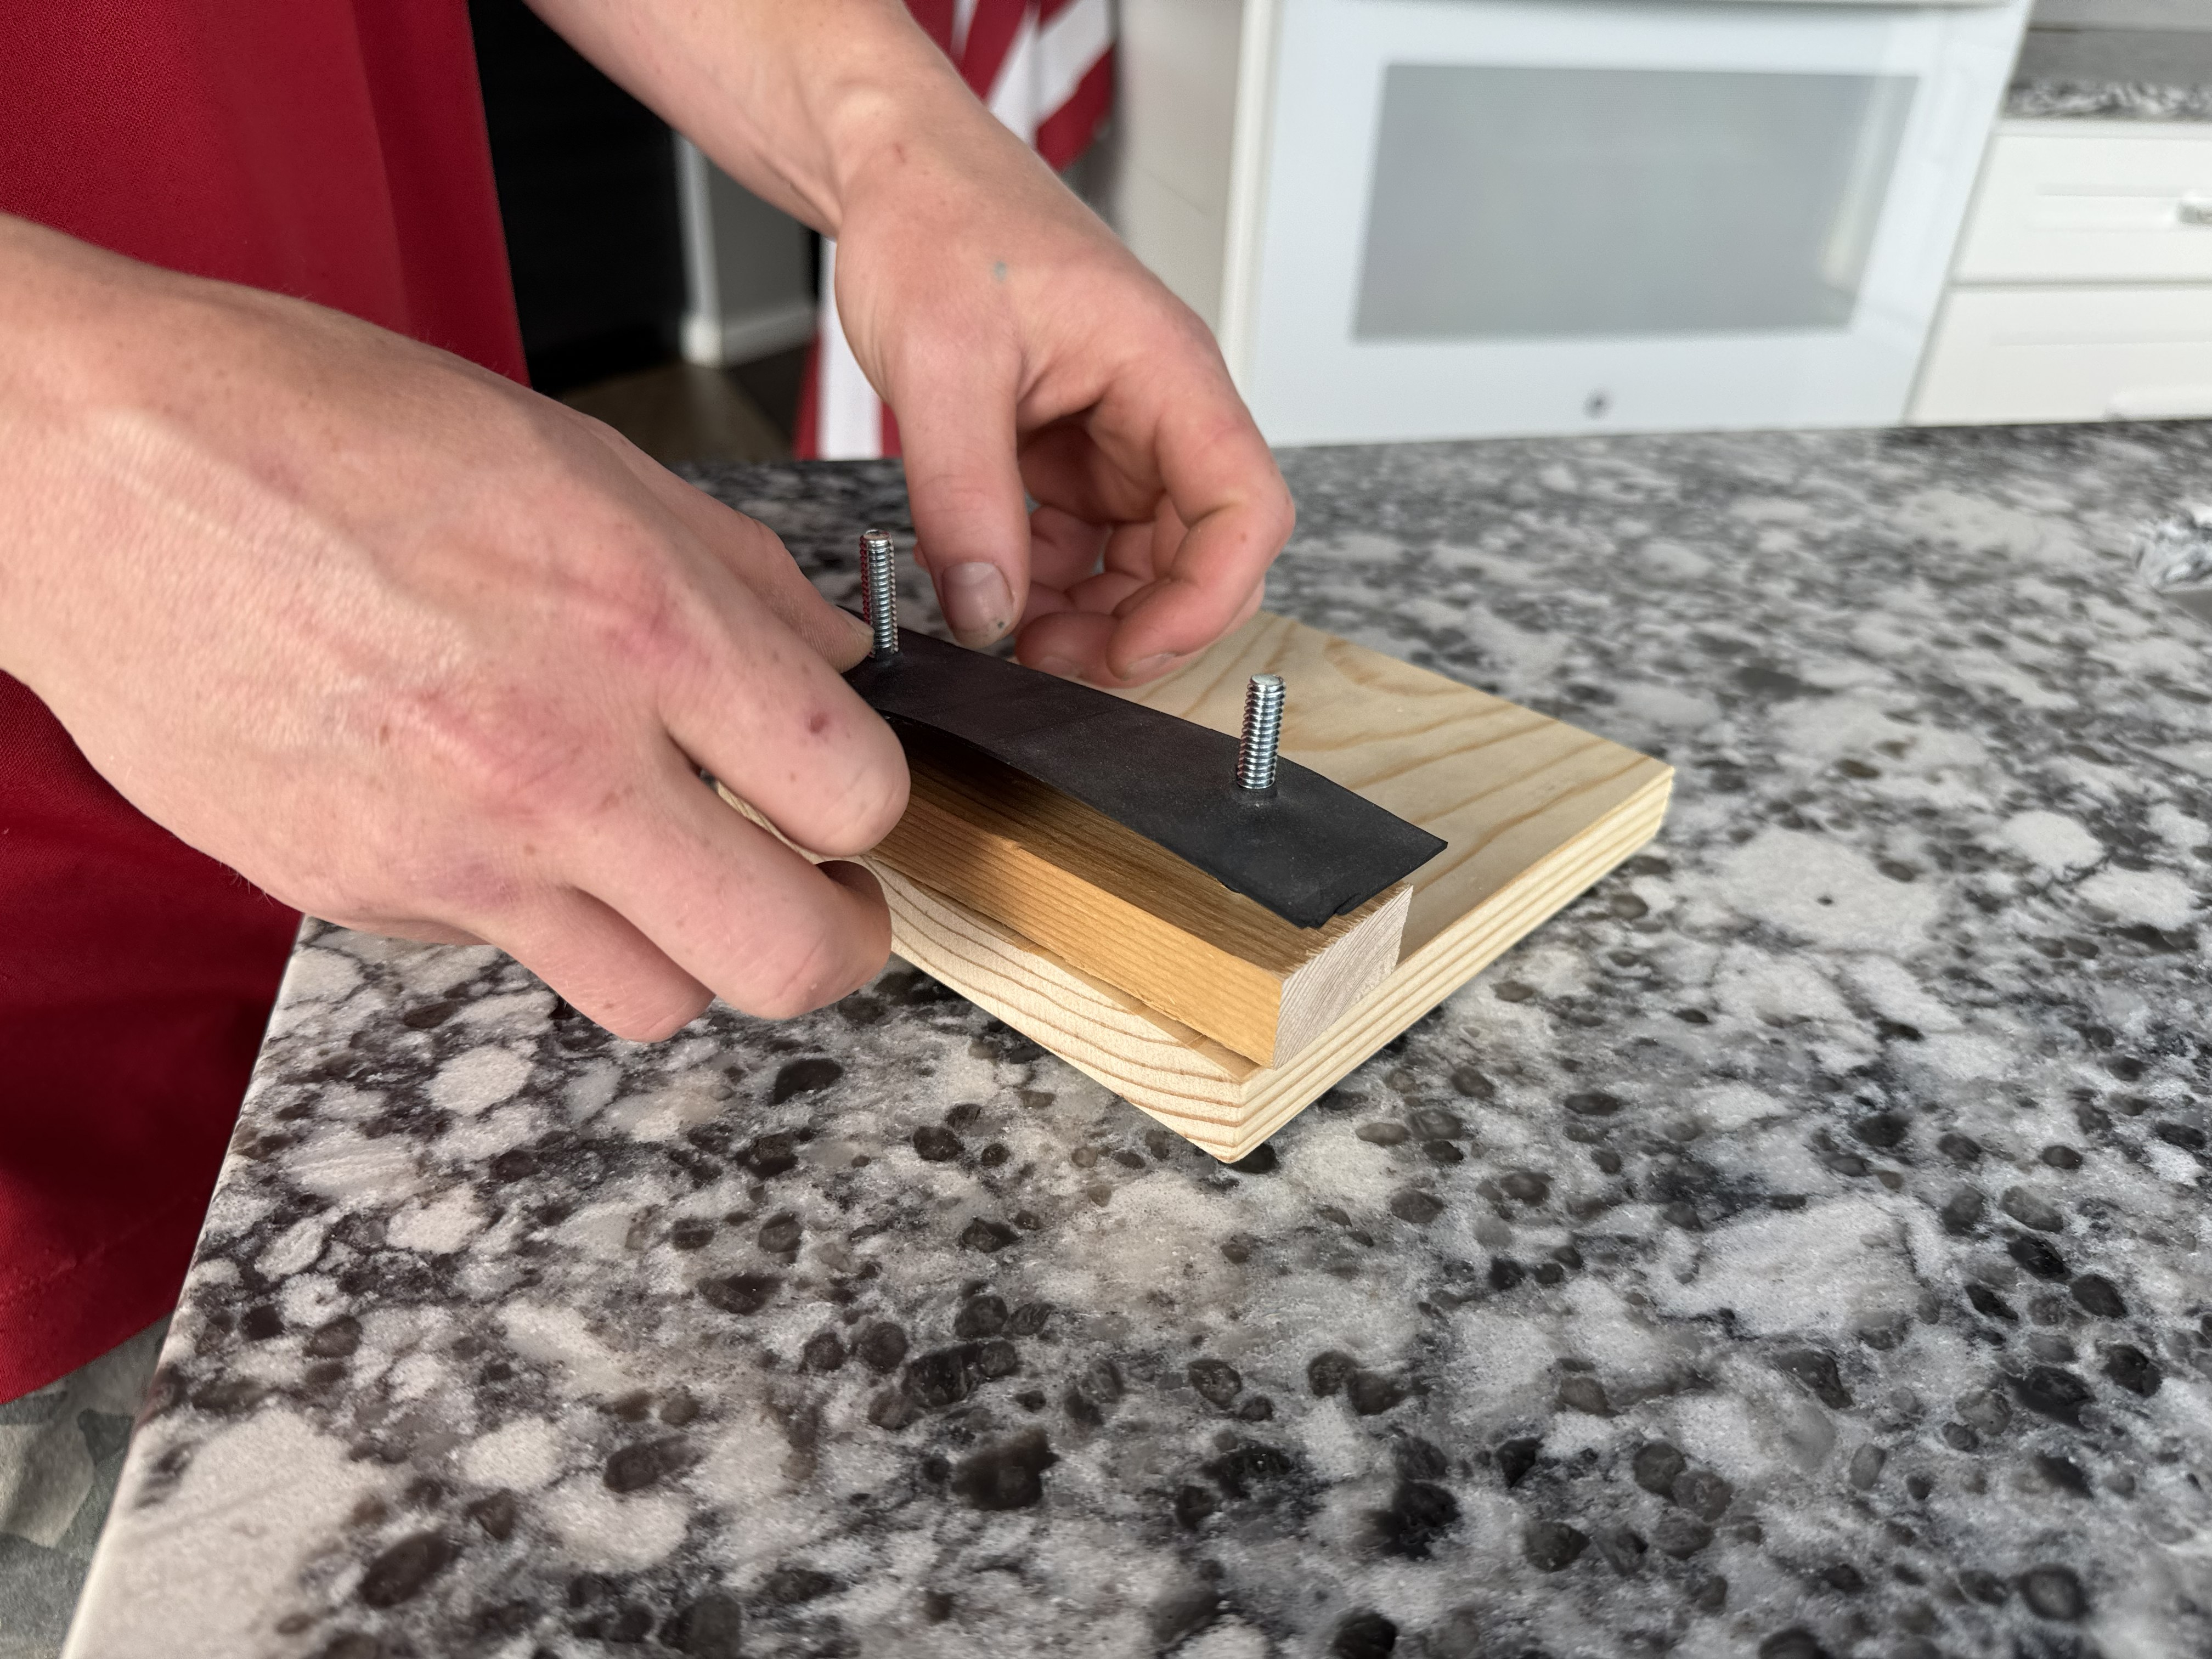
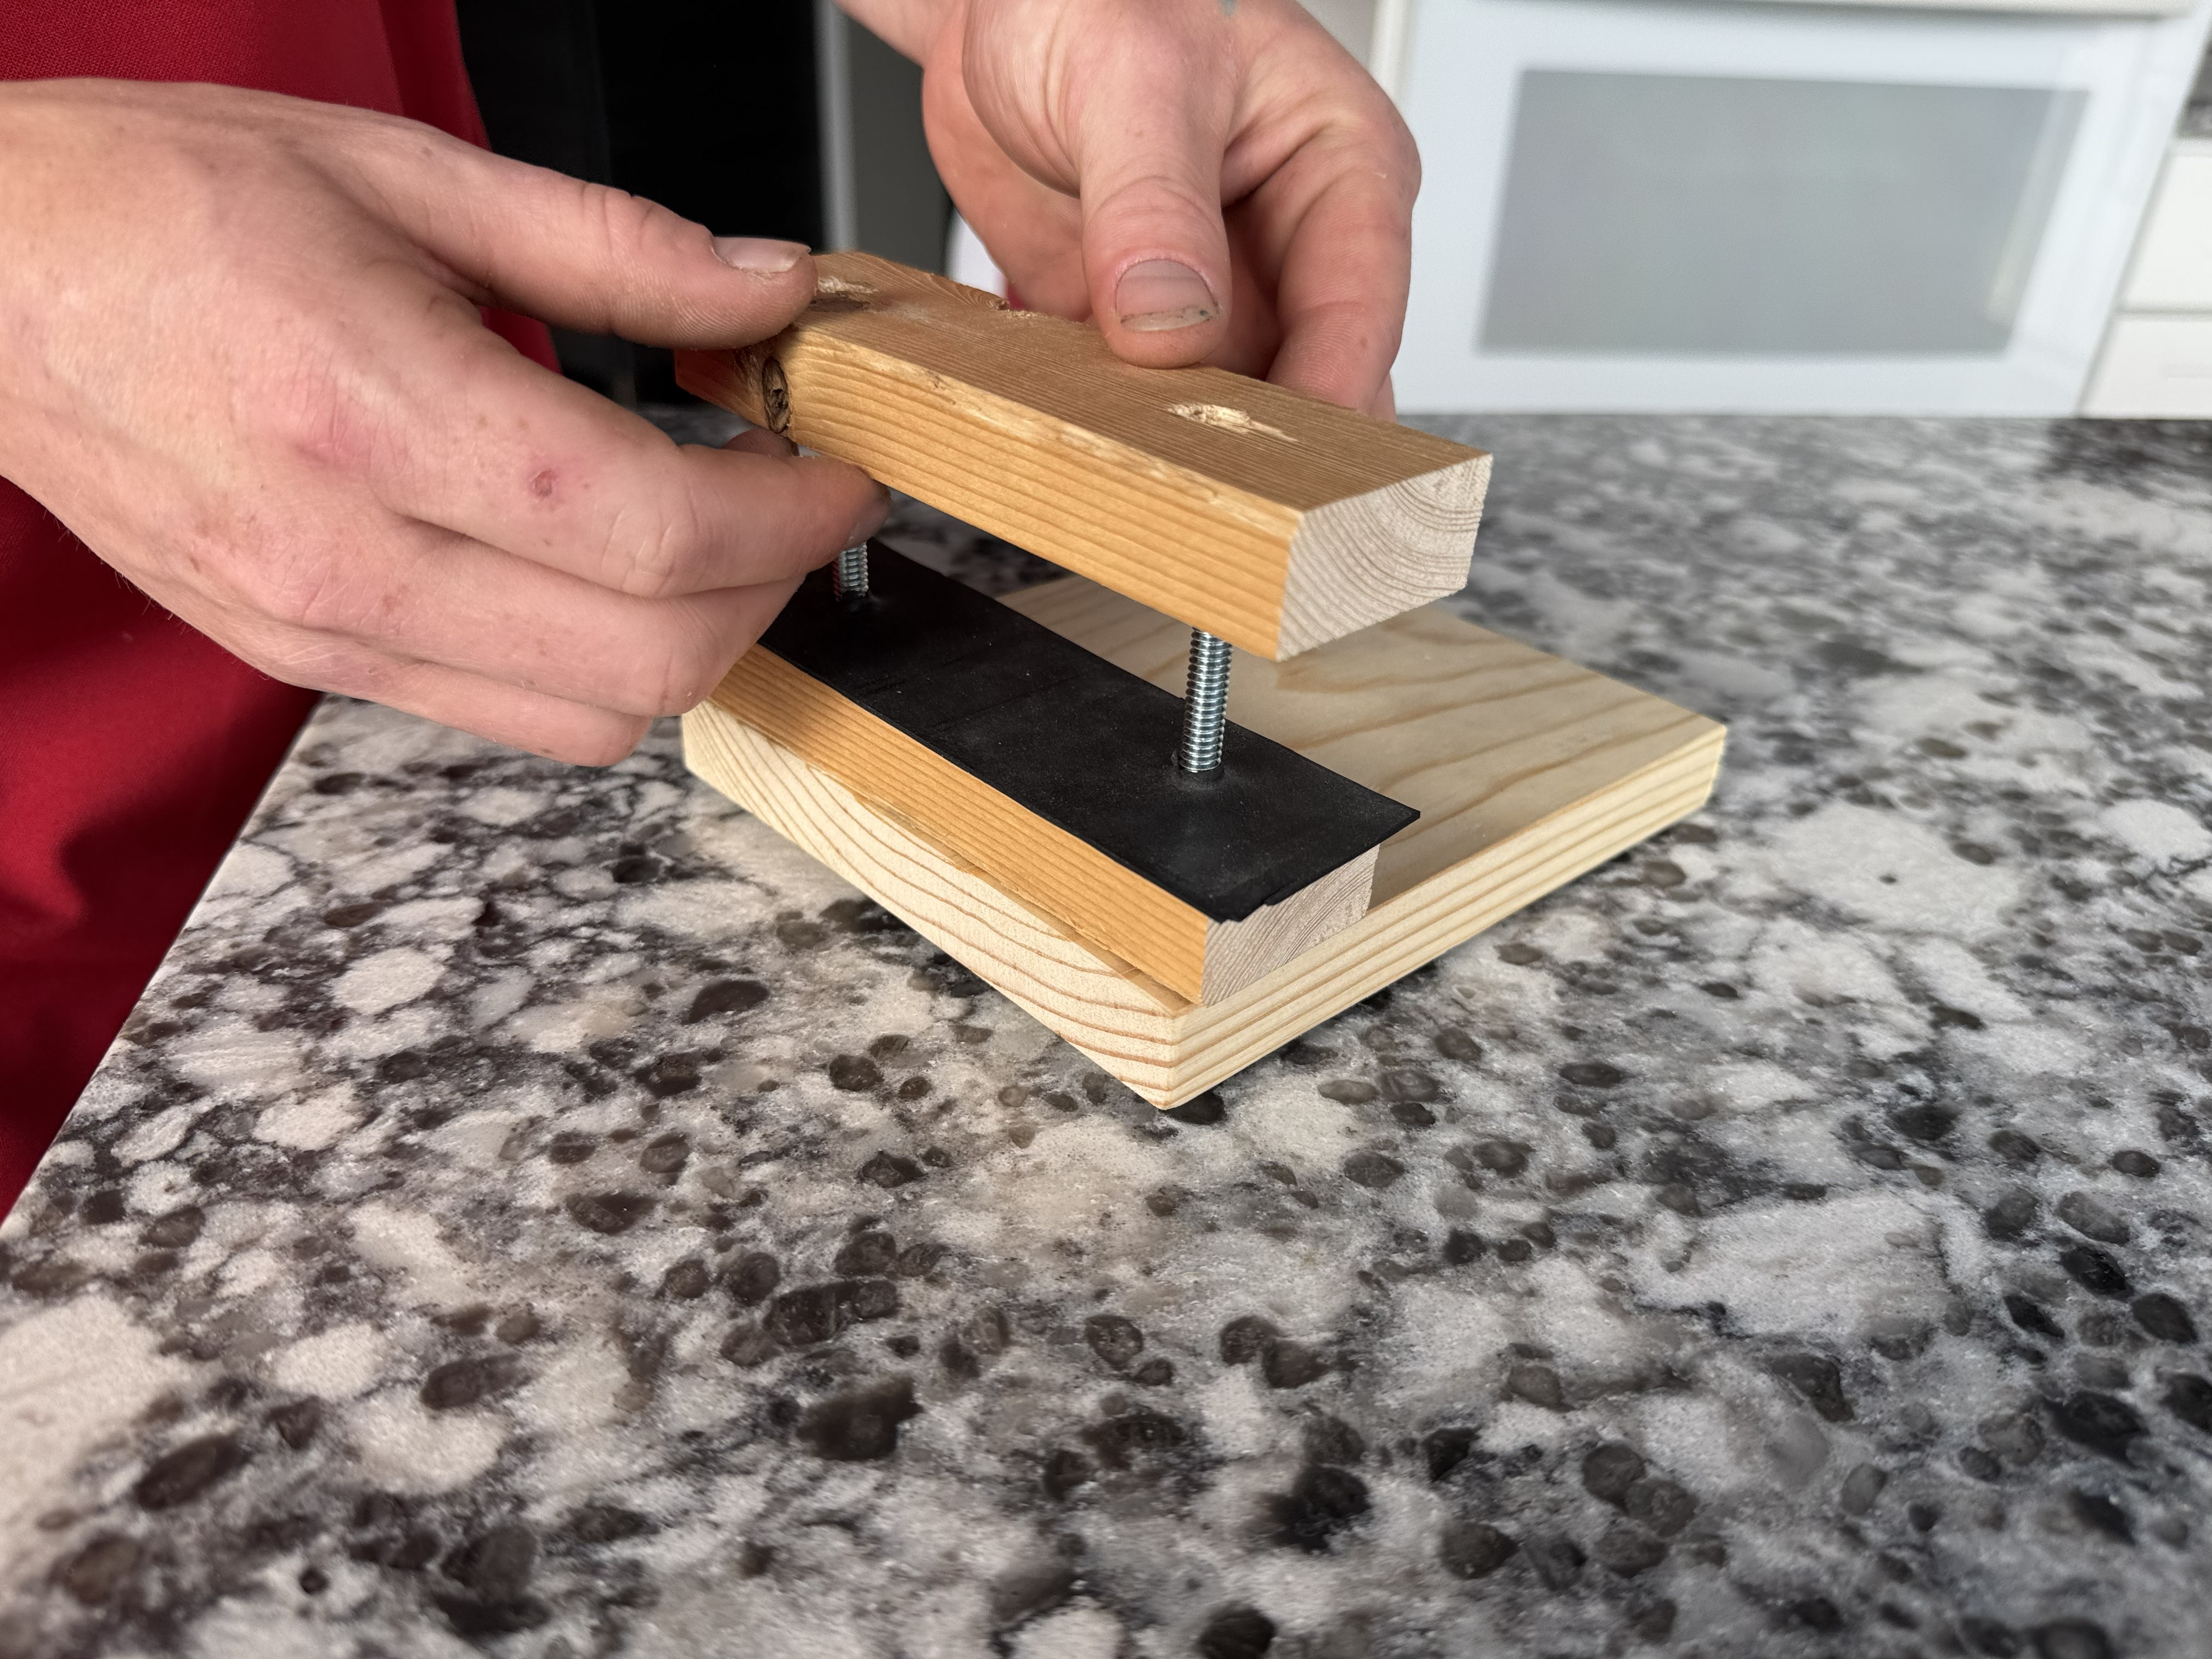
Next, place the rubber strip onto the bolts using its preinstalled holes. The rubber strip helps hold the popsicle sticks firmly in place. After the rubber strip is installed, repeat Step 2 by adding the second Piece A onto the bolts. Ensure all layers remain aligned with the base.
Step 4: Attach the Wing Nuts
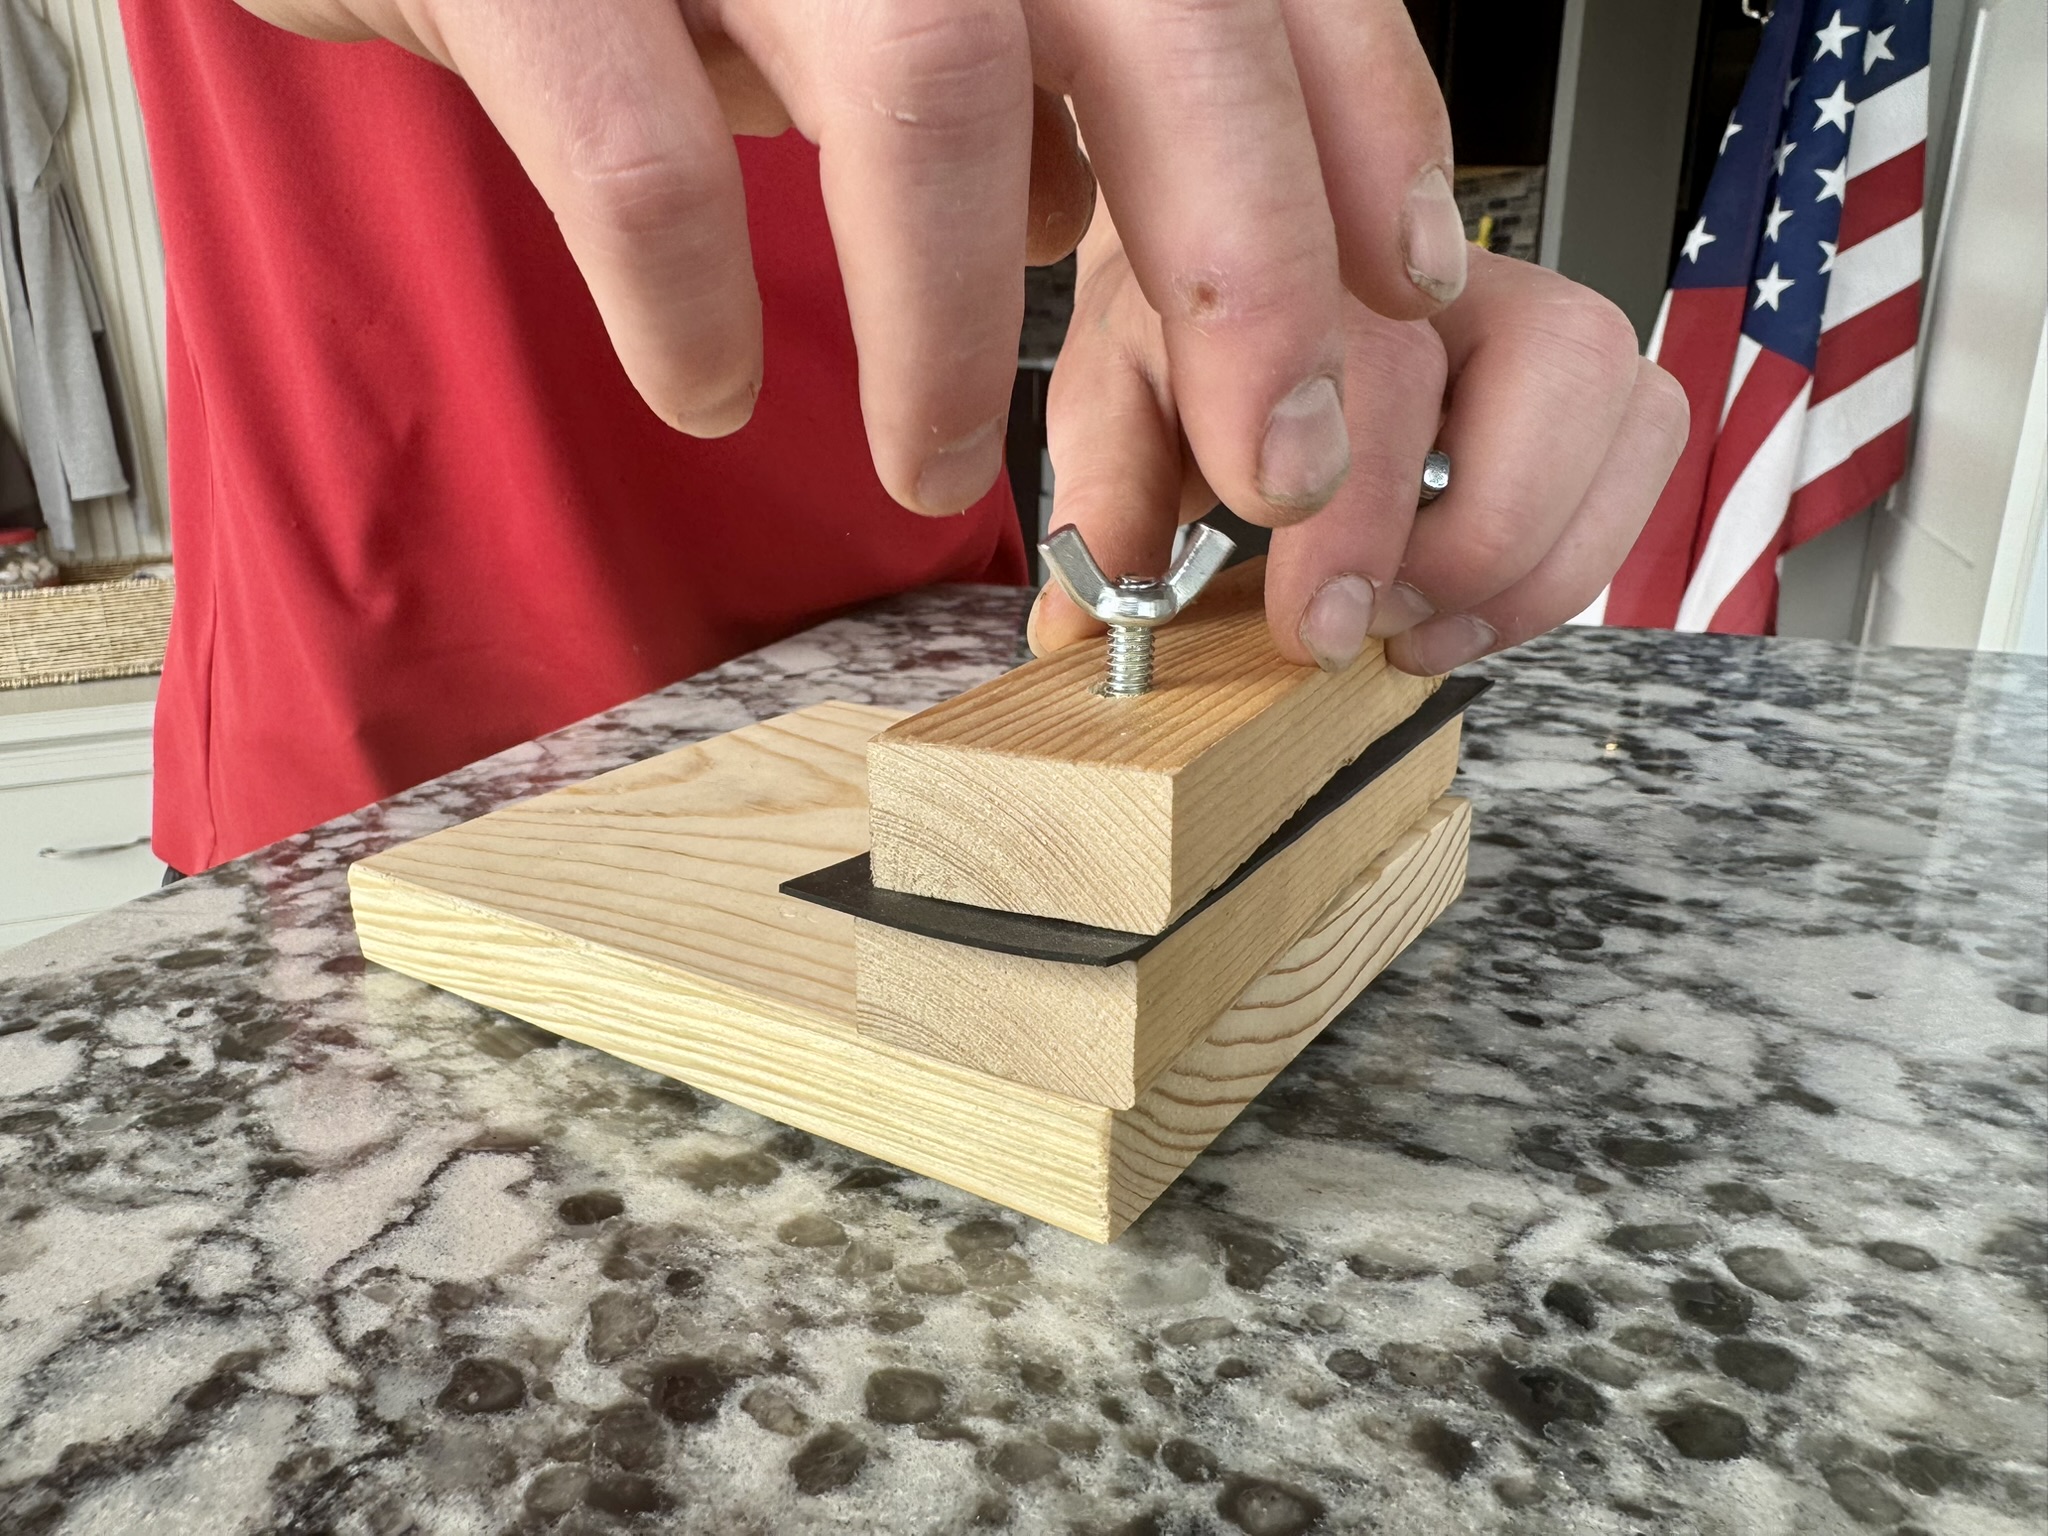
Once both A pieces and rubber strip at installed correctly and flushed with the base (piece B). Thread one wing nut onto each carriage bolt. Do not fully tighten them yet. Leave enough space between the wood layers so the popsicle sticks can slide into position.
Step 5: Add the Popsicle Sticks
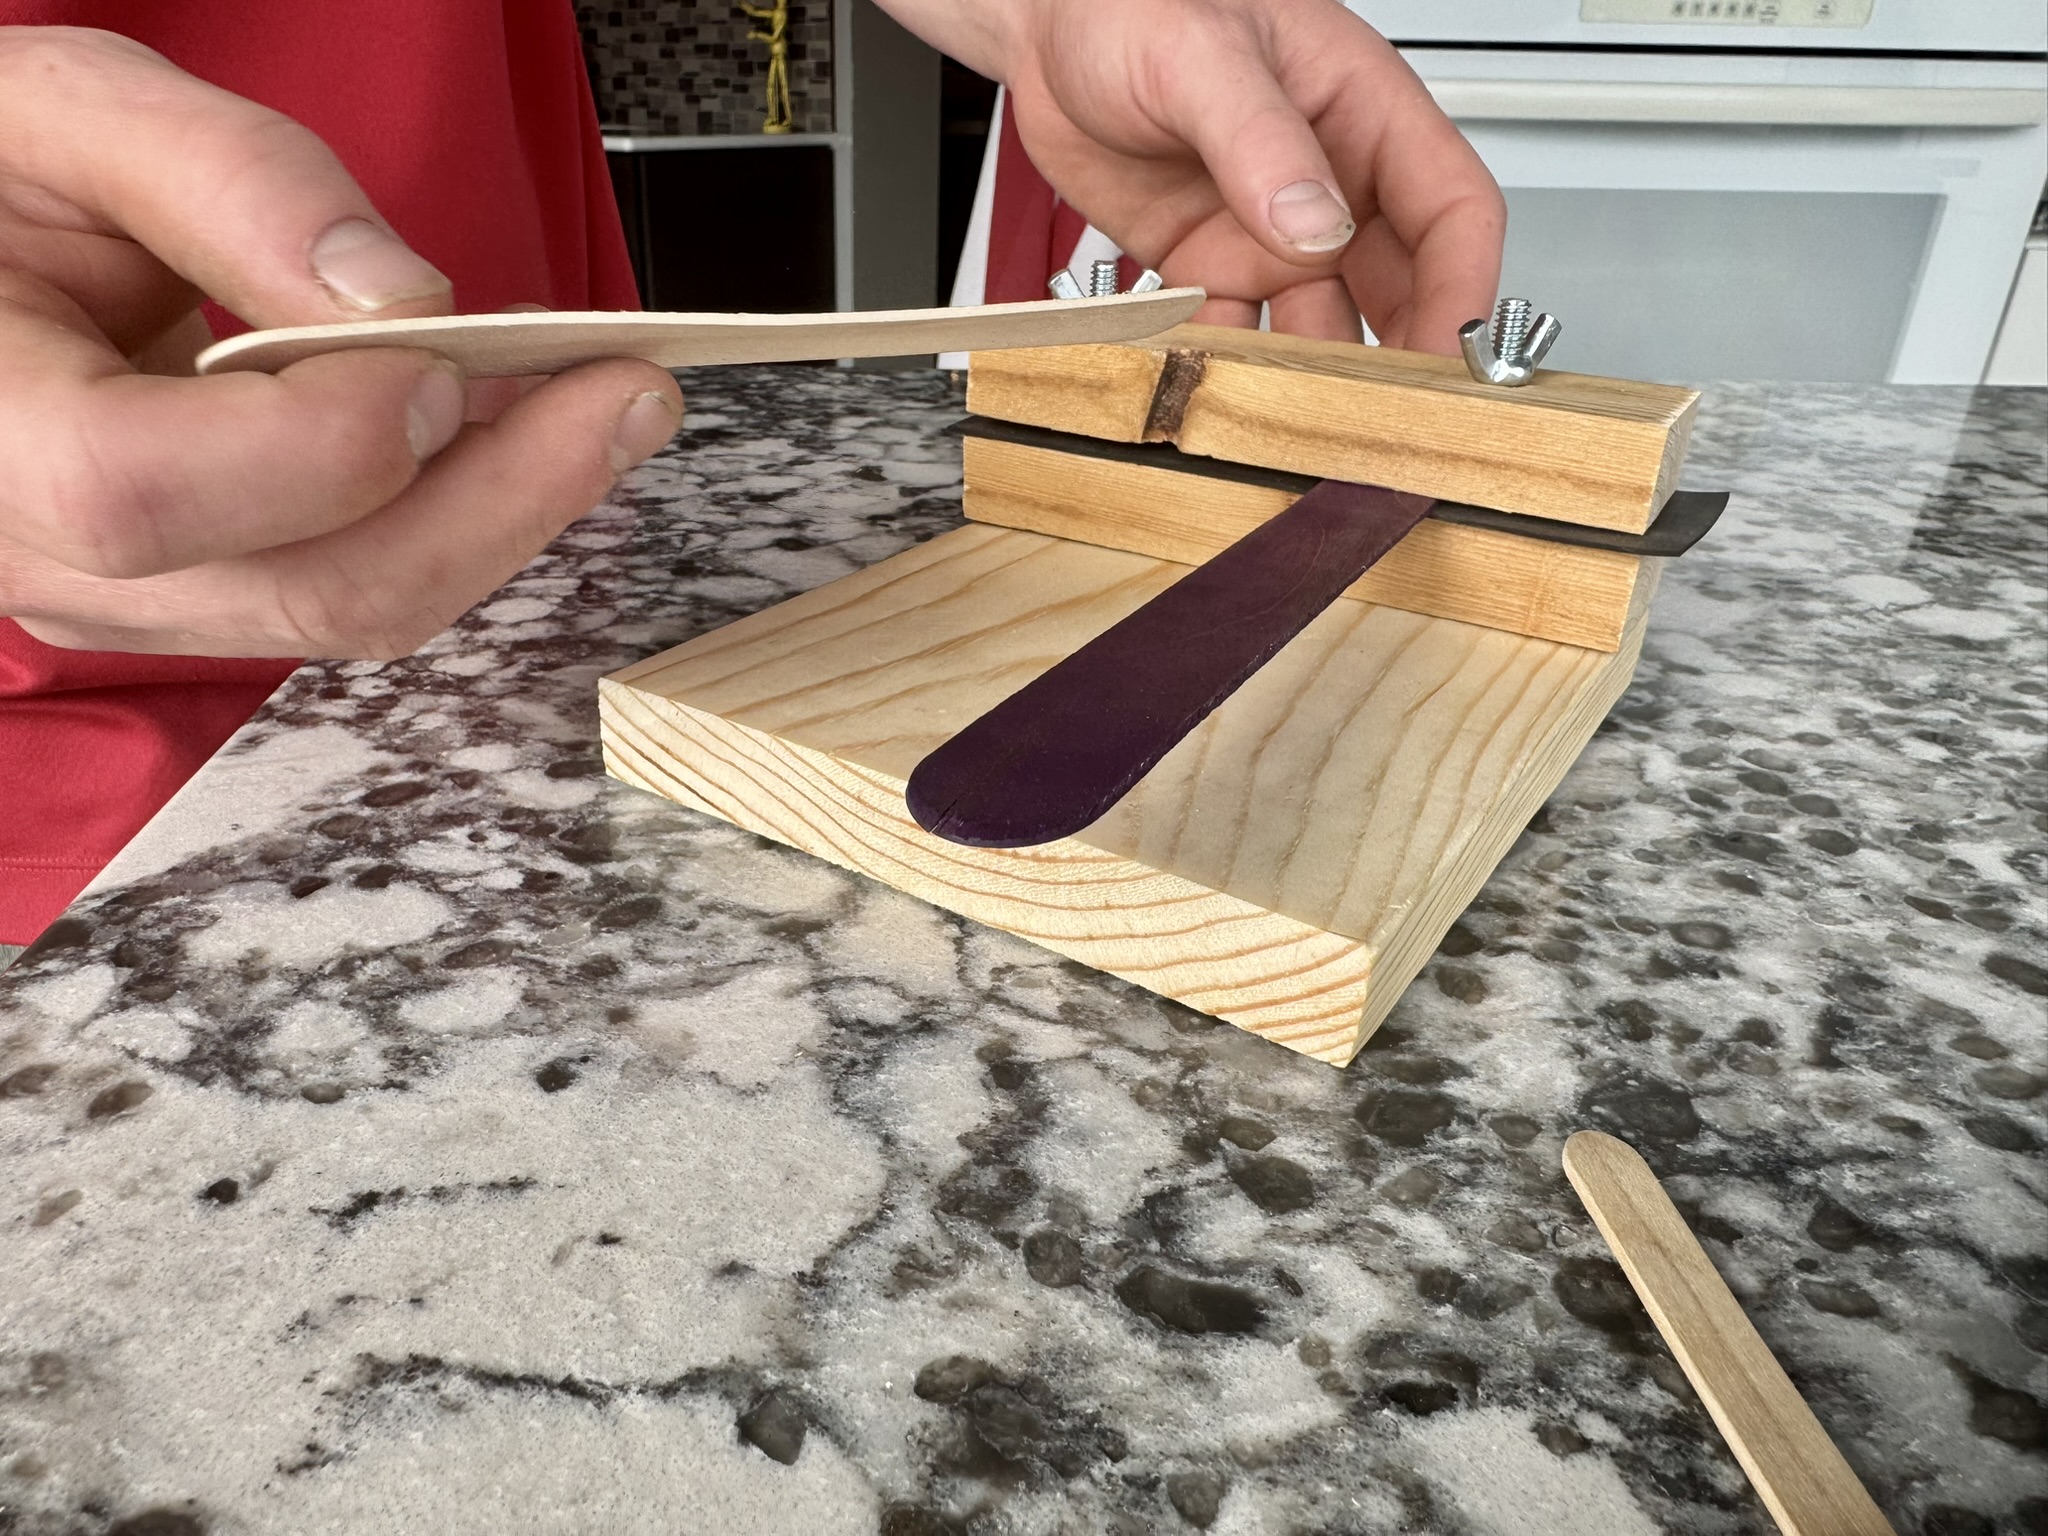
Slide the popsicle sticks between the top Piece A and the rubber strip to create the kalimba sound board.
Insert the sticks in this order:
• large popsicle stick
• medium popsicle stick
• two small popsicle sticks
Leave part of each stick extending outward so it can be plucked. Refer to example images for placement guidance.
Step 6: Secure and Finish Your Kalimba
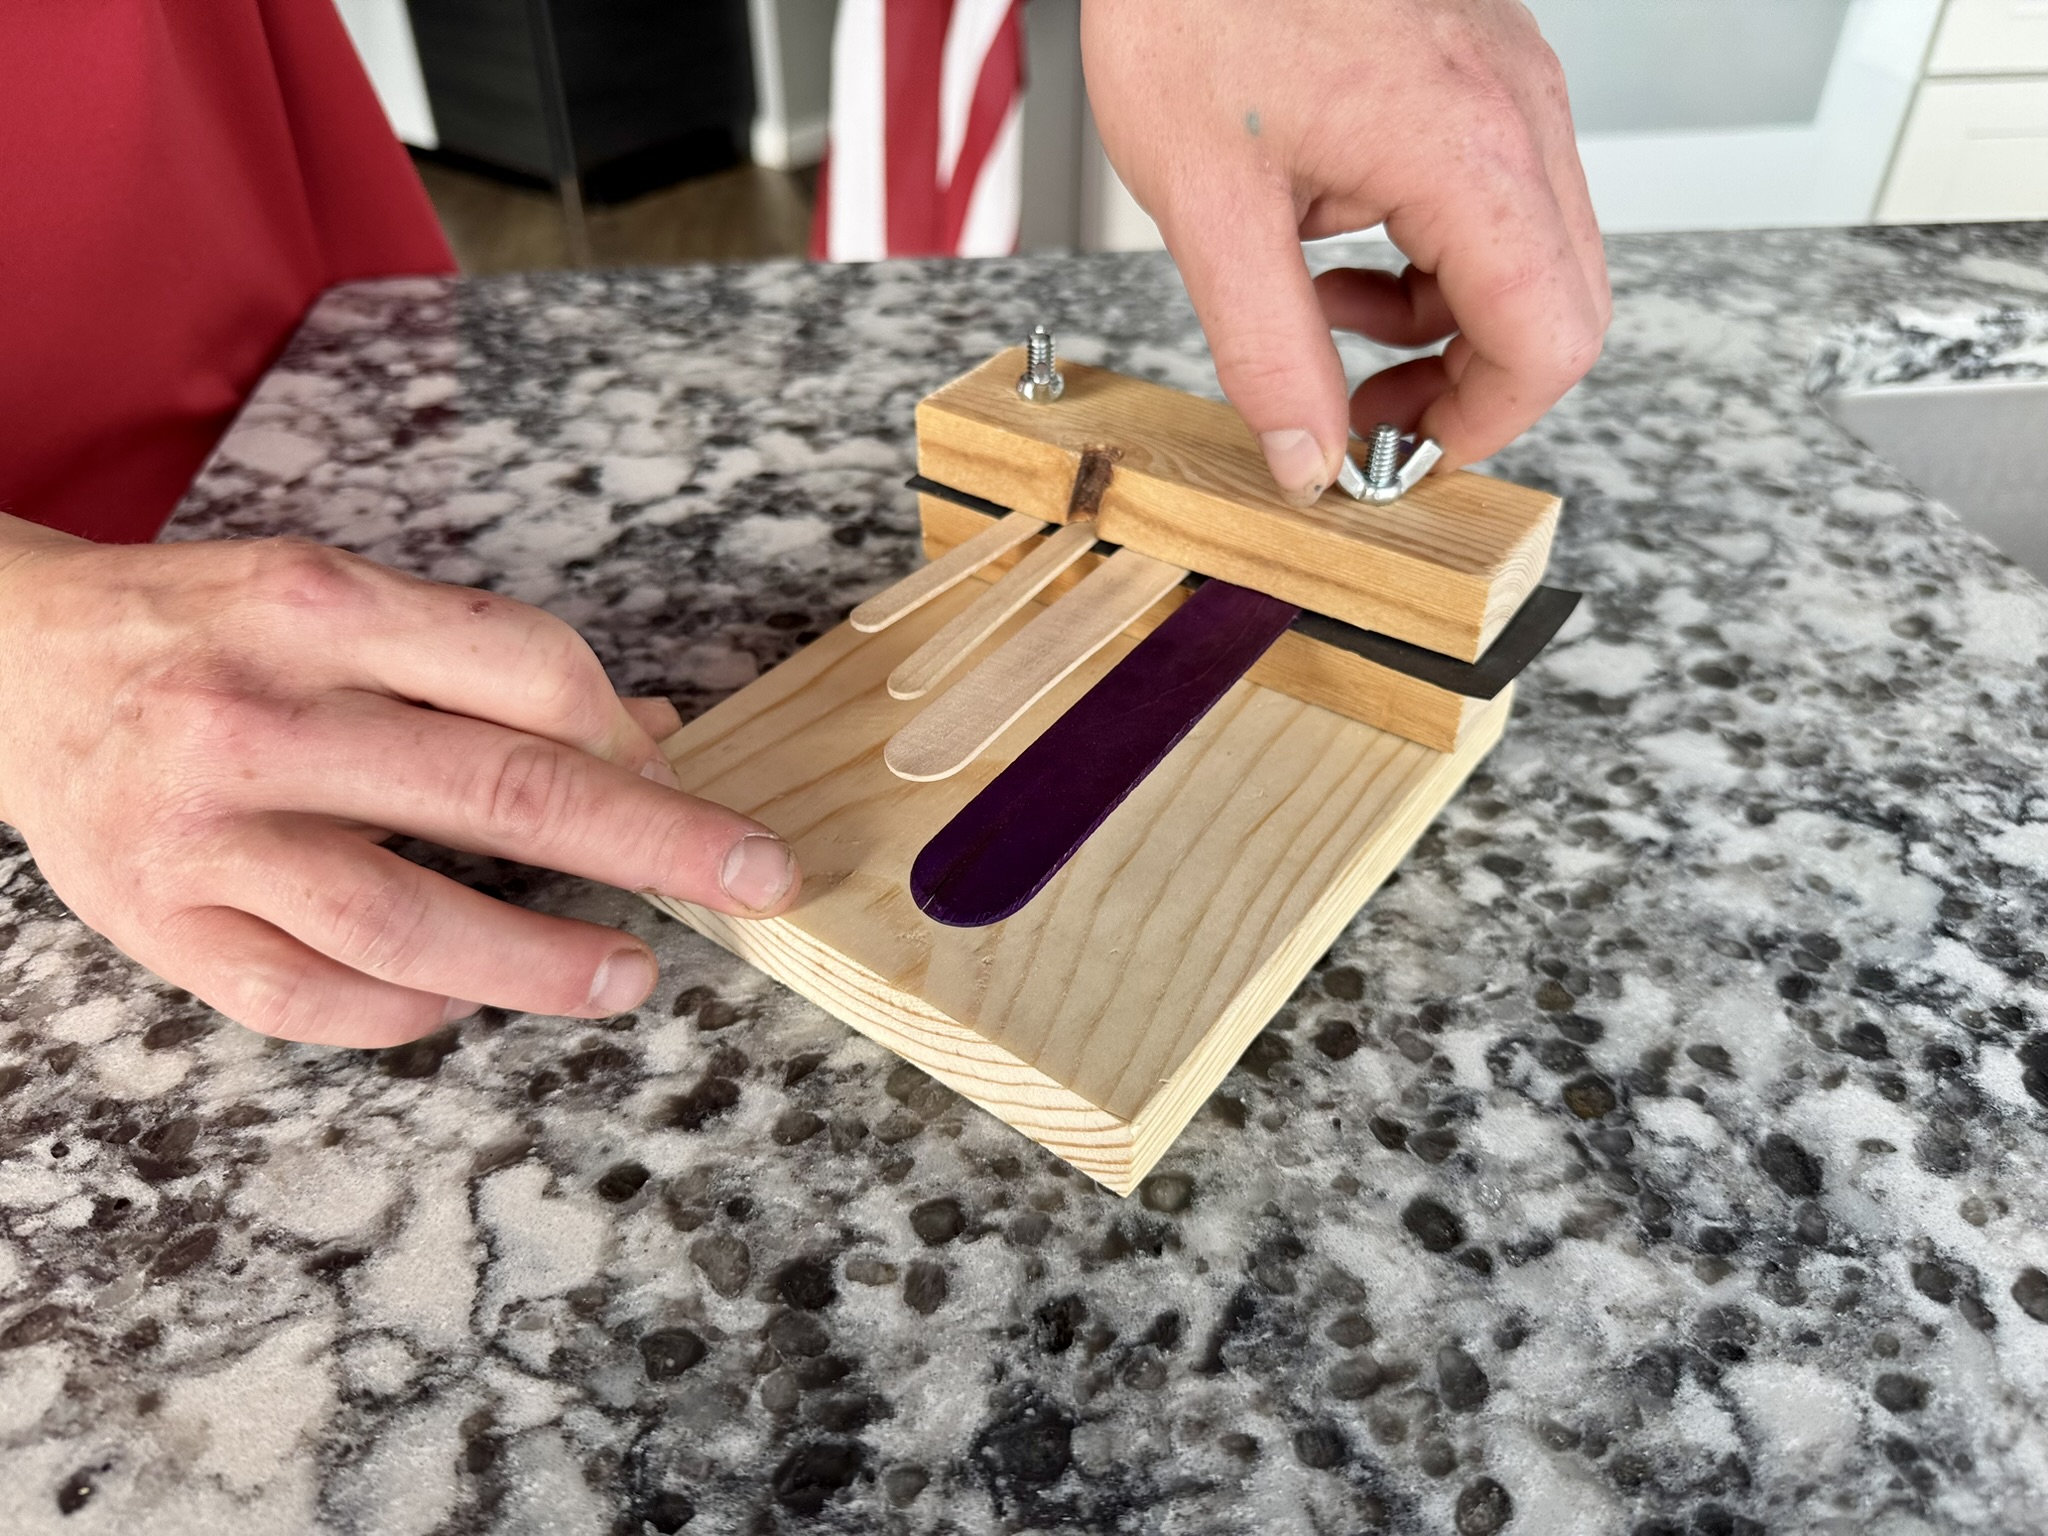
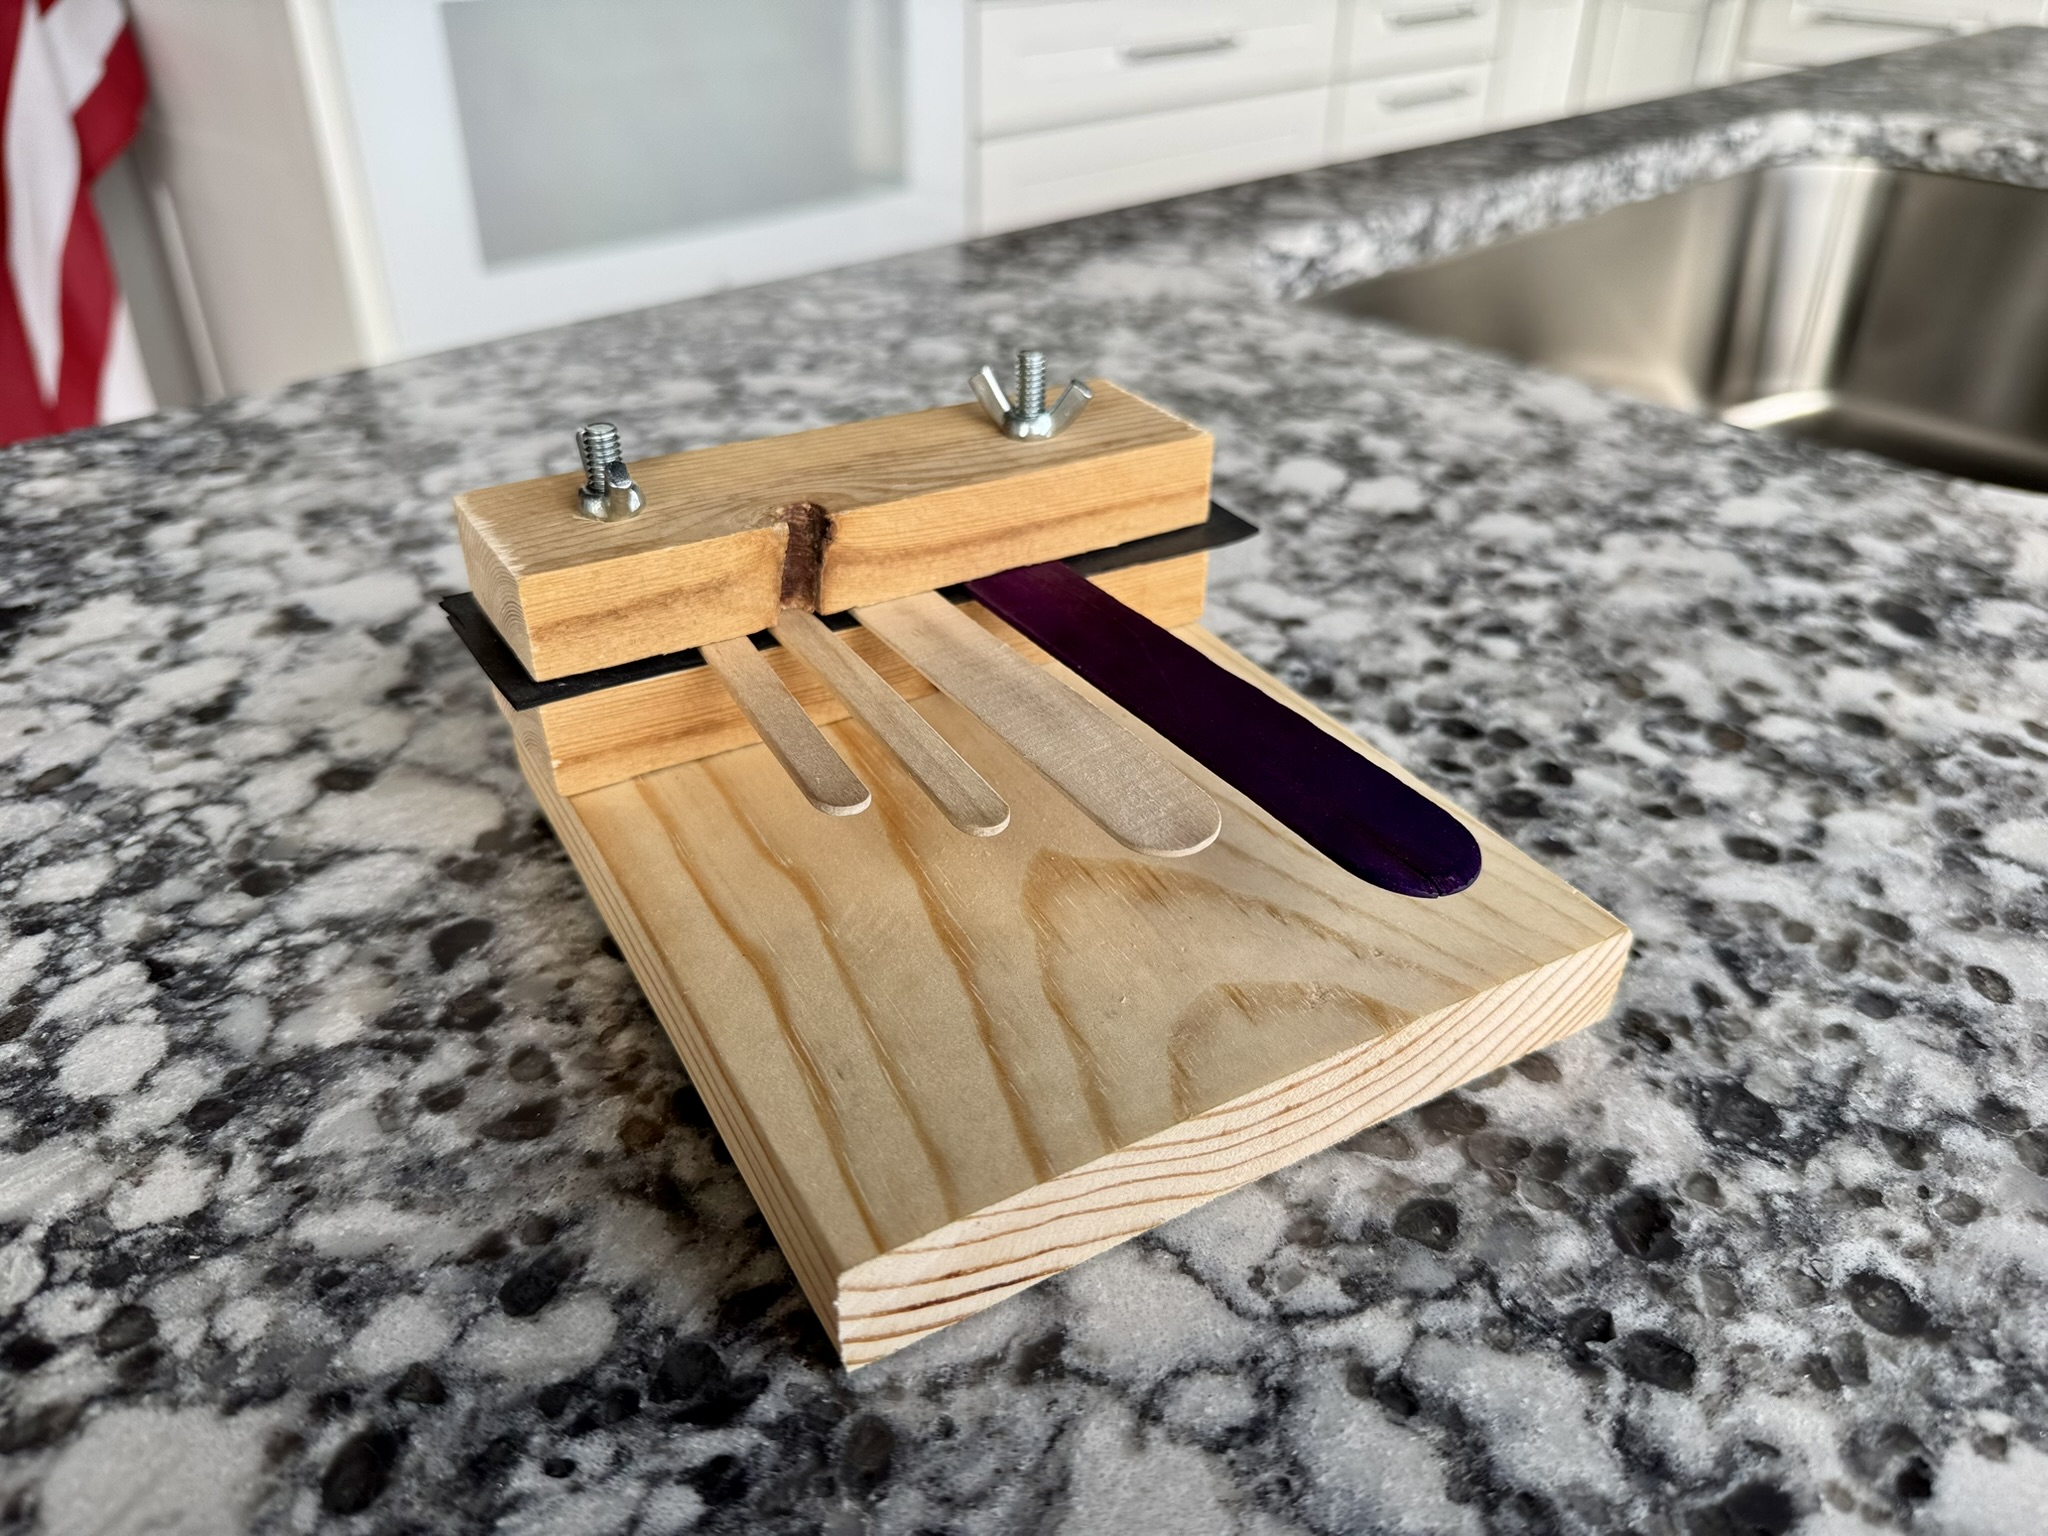
Once the sticks are positioned, tighten the wing nuts evenly until the popsicle sticks are held firmly in place. The sticks should not move or make a buzzing sound when plucked.
Your DIY Kalimba is now complete. Decorate it, personalize it, and enjoy making music with your handmade instrument.
Tips for Building Your Thumb Piano
- Use straight popsicle sticks so the notes sound cleaner when plucked.
- Do not overtighten the nuts at first. Tighten gradually while testing the sound.
- If a stick sounds buzzy, tighten slightly or reposition it.
- A wing nut makes adjustments quick and easy during setup.
- Try labeling the sticks with a marker once you find notes you like.
- Different thickness popsicle sticks can create interesting sound variations.
- Adding a small wood box or resting the instrument on a table can make the sound louder.
- Build several thumb pianos with different stick lengths for a full set of tones.
Conclusion
Building a thumb piano is a fun hands on project that combines creativity, woodworking, and music. With only a few simple materials, you can create a unique instrument that sounds different every time it is built. The best part is experimenting with stick placement and discovering new sounds. Whether used in a classroom, at home, or as a DIY weekend project, a homemade thumb piano encourages creativity, problem solving, and musical exploration.
Supplies to Help You Get Started


Build Your Own DIY Kalimba: A Beginner's Guide to Crafting This Beautiful Instrument
The kalimba, also known as the thumb piano,is one of the most accessible and melodically enchanting instruments in the world. With its gentle, resonant tones and compact size, it has captured the hearts of musicians and hobbyists alike. The good news? You can build one yourself with minimal tools and materials.
What You'll Need
Before getting started, gather the following materials:
- Pieces A: (2) 1 in. x 2 in. x 5-1/2 in. Wood Pieces
- Piece B: (1) 1 in. x 6 in. x 6 in. Wood Piece
- (2) Small Popsicle Sticks
- (1) Medium Popsicle Sticks
- (1) Large Popsicle Sticks
- (1) 5-1/5 in. Rubber Strip
- (2) 3-1/2 in. Carriage Bolts
- (2) Wing Nuts
Step-by-Step Instructions
Step 1: Insert the Carriage Bolts into the Base
Start with Piece B, the 6 inch by 6 inch wood base. Insert both carriage bolts into the predrilled holes on Piece B. Push the bolts all the way through so they stand upright and secure in the base.
Step 2: Install the First Support Piece
Take one Piece A and slide it onto the carriage bolts using the predrilled holes. Make sure the edges of Piece A line up evenly with the sides of Piece B so everything sits flush and straight.
Step 3: Add the Rubber Strip and Second Support Piece
Next, place the rubber strip onto the bolts using its preinstalled holes. The rubber strip helps hold the popsicle sticks firmly in place. After the rubber strip is installed, repeat Step 2 by adding the second Piece A onto the bolts. Ensure all layers remain aligned with the base.
Step 4: Attach the Wing Nuts
Once both A pieces and rubber strip at installed correctly and flushed with the base (piece B). Thread one wing nut onto each carriage bolt. Do not fully tighten them yet. Leave enough space between the wood layers so the popsicle sticks can slide into position.
Step 5: Add the Popsicle Sticks
Slide the popsicle sticks between the top Piece A and the rubber strip to create the kalimba sound board.
Insert the sticks in this order:
• large popsicle stick
• medium popsicle stick
• two small popsicle sticks
Leave part of each stick extending outward so it can be plucked. Refer to example images for placement guidance.
Step 6: Secure and Finish Your Kalimba
Once the sticks are positioned, tighten the wing nuts evenly until the popsicle sticks are held firmly in place. The sticks should not move or make a buzzing sound when plucked.
Your DIY Kalimba is now complete. Decorate it, personalize it, and enjoy making music with your handmade instrument.
Tips for Building Your Thumb Piano
- Use straight popsicle sticks so the notes sound cleaner when plucked.
- Do not overtighten the nuts at first. Tighten gradually while testing the sound.
- If a stick sounds buzzy, tighten slightly or reposition it.
- A wing nut makes adjustments quick and easy during setup.
- Try labeling the sticks with a marker once you find notes you like.
- Different thickness popsicle sticks can create interesting sound variations.
- Adding a small wood box or resting the instrument on a table can make the sound louder.
- Build several thumb pianos with different stick lengths for a full set of tones.
Conclusion
Building a thumb piano is a fun hands on project that combines creativity, woodworking, and music. With only a few simple materials, you can create a unique instrument that sounds different every time it is built. The best part is experimenting with stick placement and discovering new sounds. Whether used in a classroom, at home, or as a DIY weekend project, a homemade thumb piano encourages creativity, problem solving, and musical exploration.
Supplies to Help You Get Started