
.png "diy hanging planter")

At Niehaus Lumber, the Little Builders Workshop is all about giving young builders the chance to learn, create, and have fun while building something with their own hands. Each workshop introduces kids to basic building skills in a safe, hands on environment where families work together and creativity takes center stage.
Project Introduction
The DIY Wooden Planter is a fun, hands on building project that teaches young builders how individual pieces come together to create something meaningful. By assembling the planter step by step and finishing it with flowers and decorations, kids create a handmade piece they can be proud of. This project also makes a thoughtful Mother’s Day gift, giving children the opportunity to build something special and personal straight from the heart.
Materials Needed
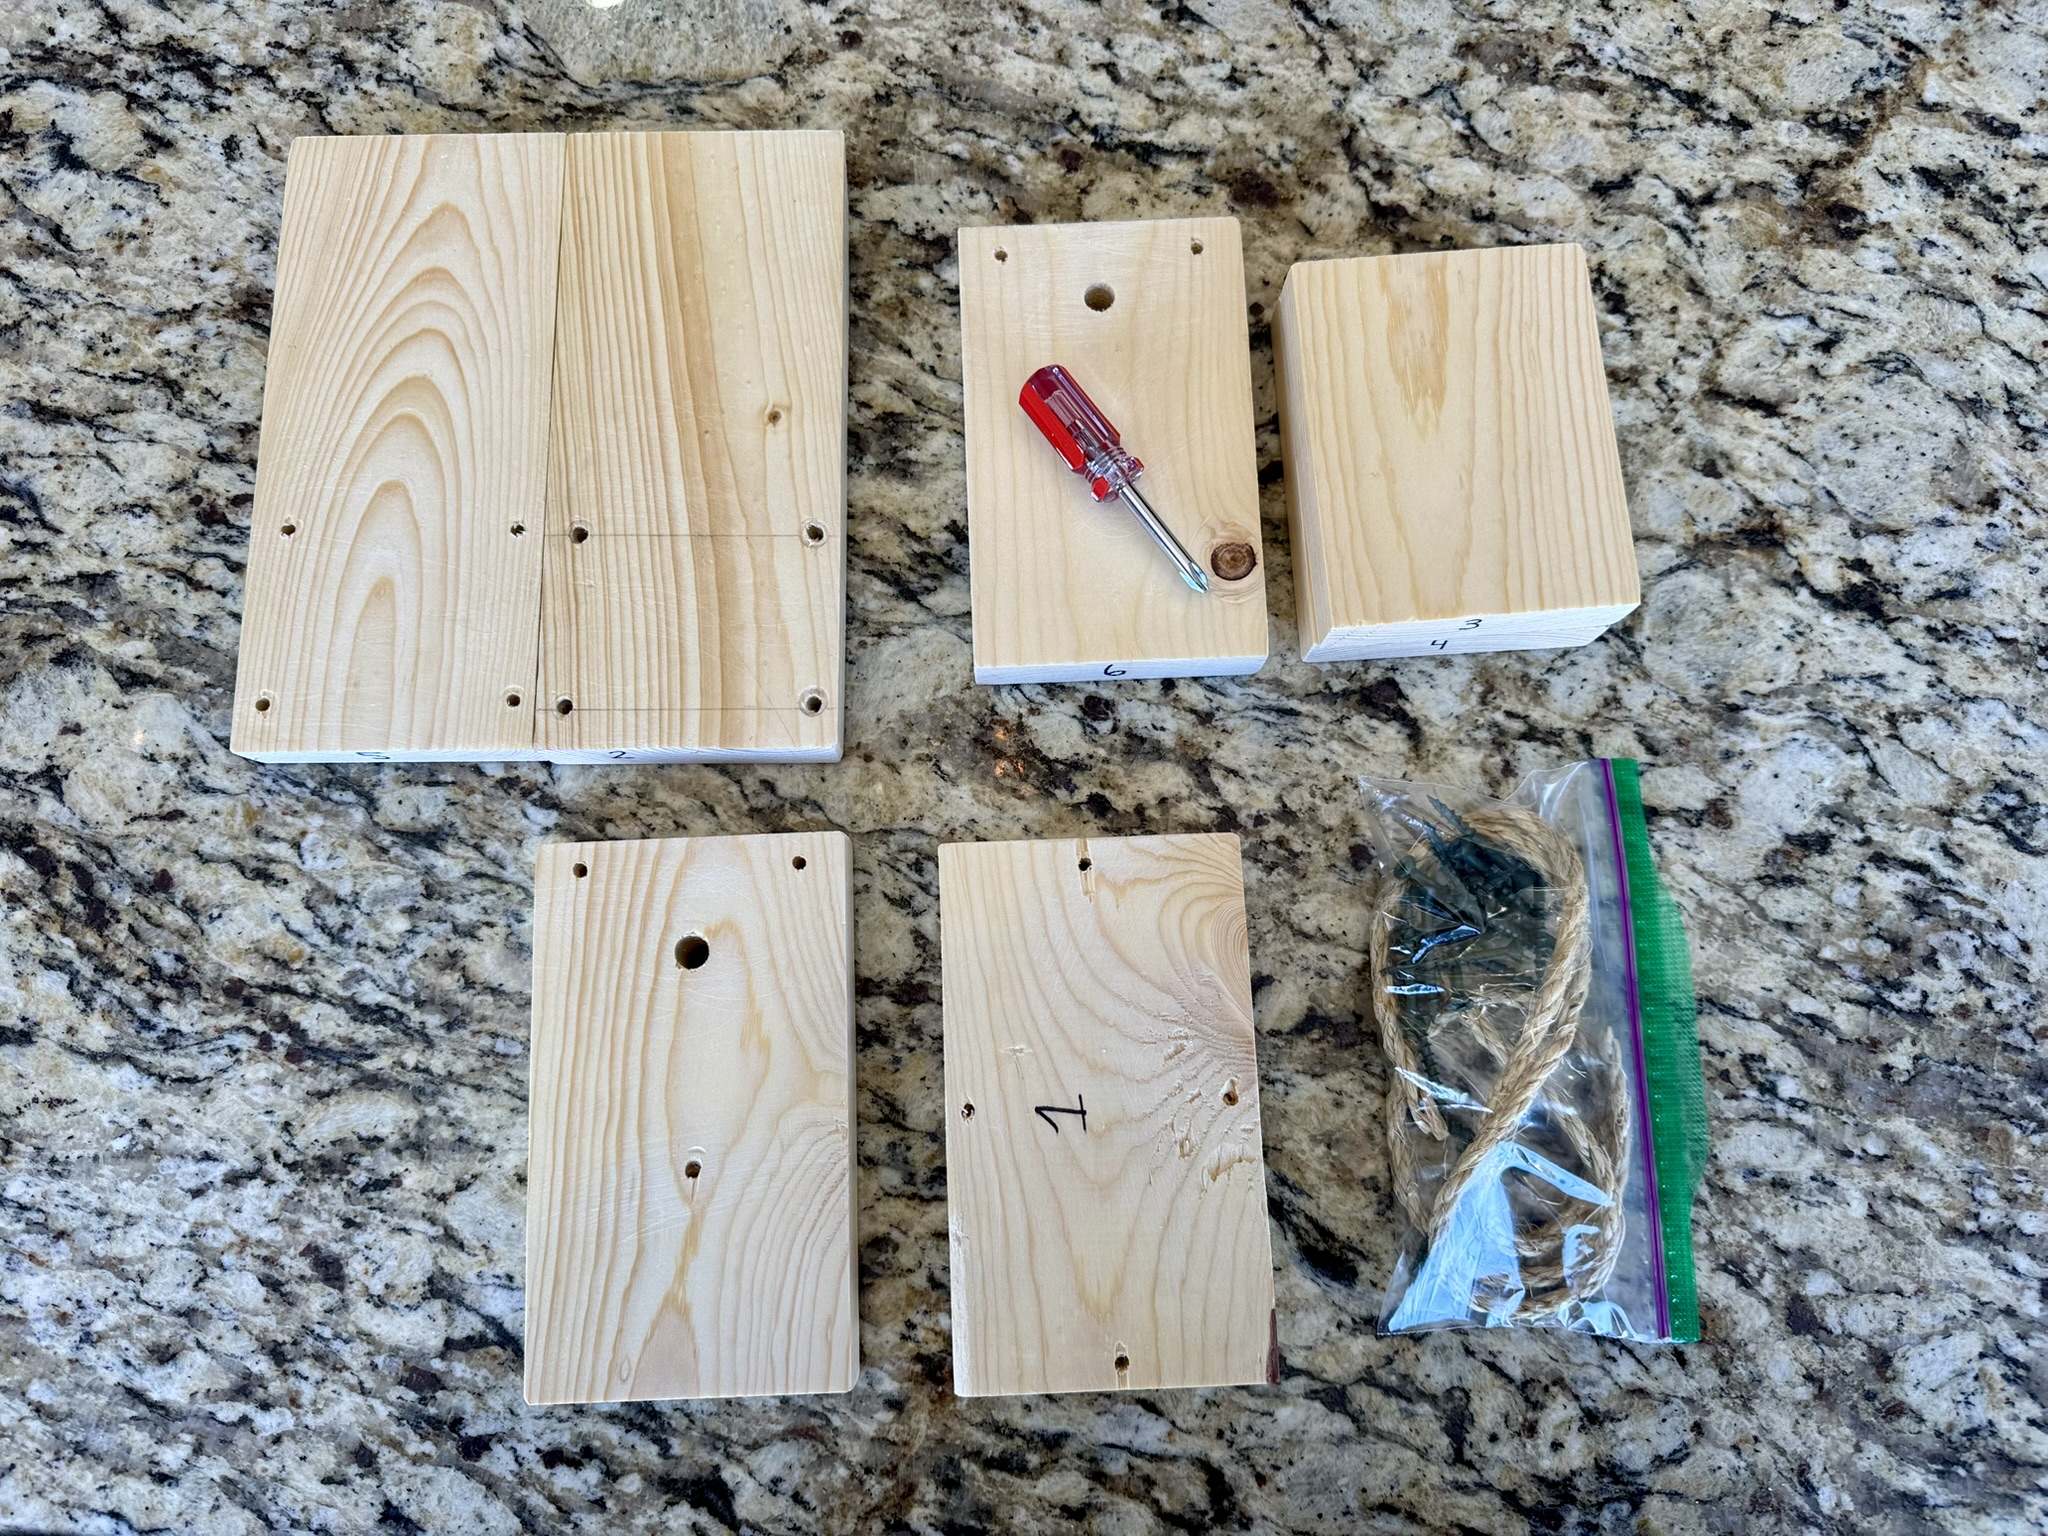
Each Little Builder received a project kit that included:
- Precut numbered wood pieces
- (2) 1"x4"x4-1/2" --> Pieces 3 and 4
- (2) 1"x4"x8" w/ slated cuts at 45 degrees in one side --> Pieces 2 and 5
- (1) 1"x4"x6" base Piece 1
- (1) 1"x4"x6" roof Piece 7 w/ large hole.
- (1) 1"x4"x5-1/2" roof Piece 6 w/ large hole
- (16) Galvanized screws
- (1) Rope piece
All materials were prepared ahead of time so kids could focus on building and having fun.
- Pull out all your pieces and lay them on a flat surface.
- Make sure you have every piece before you start. Each board has a number that will help guide you during the build.
- Ask an adult to help you with this project.
Step by Step Building Guide
Step 1: Attach Pieces 1 and 2
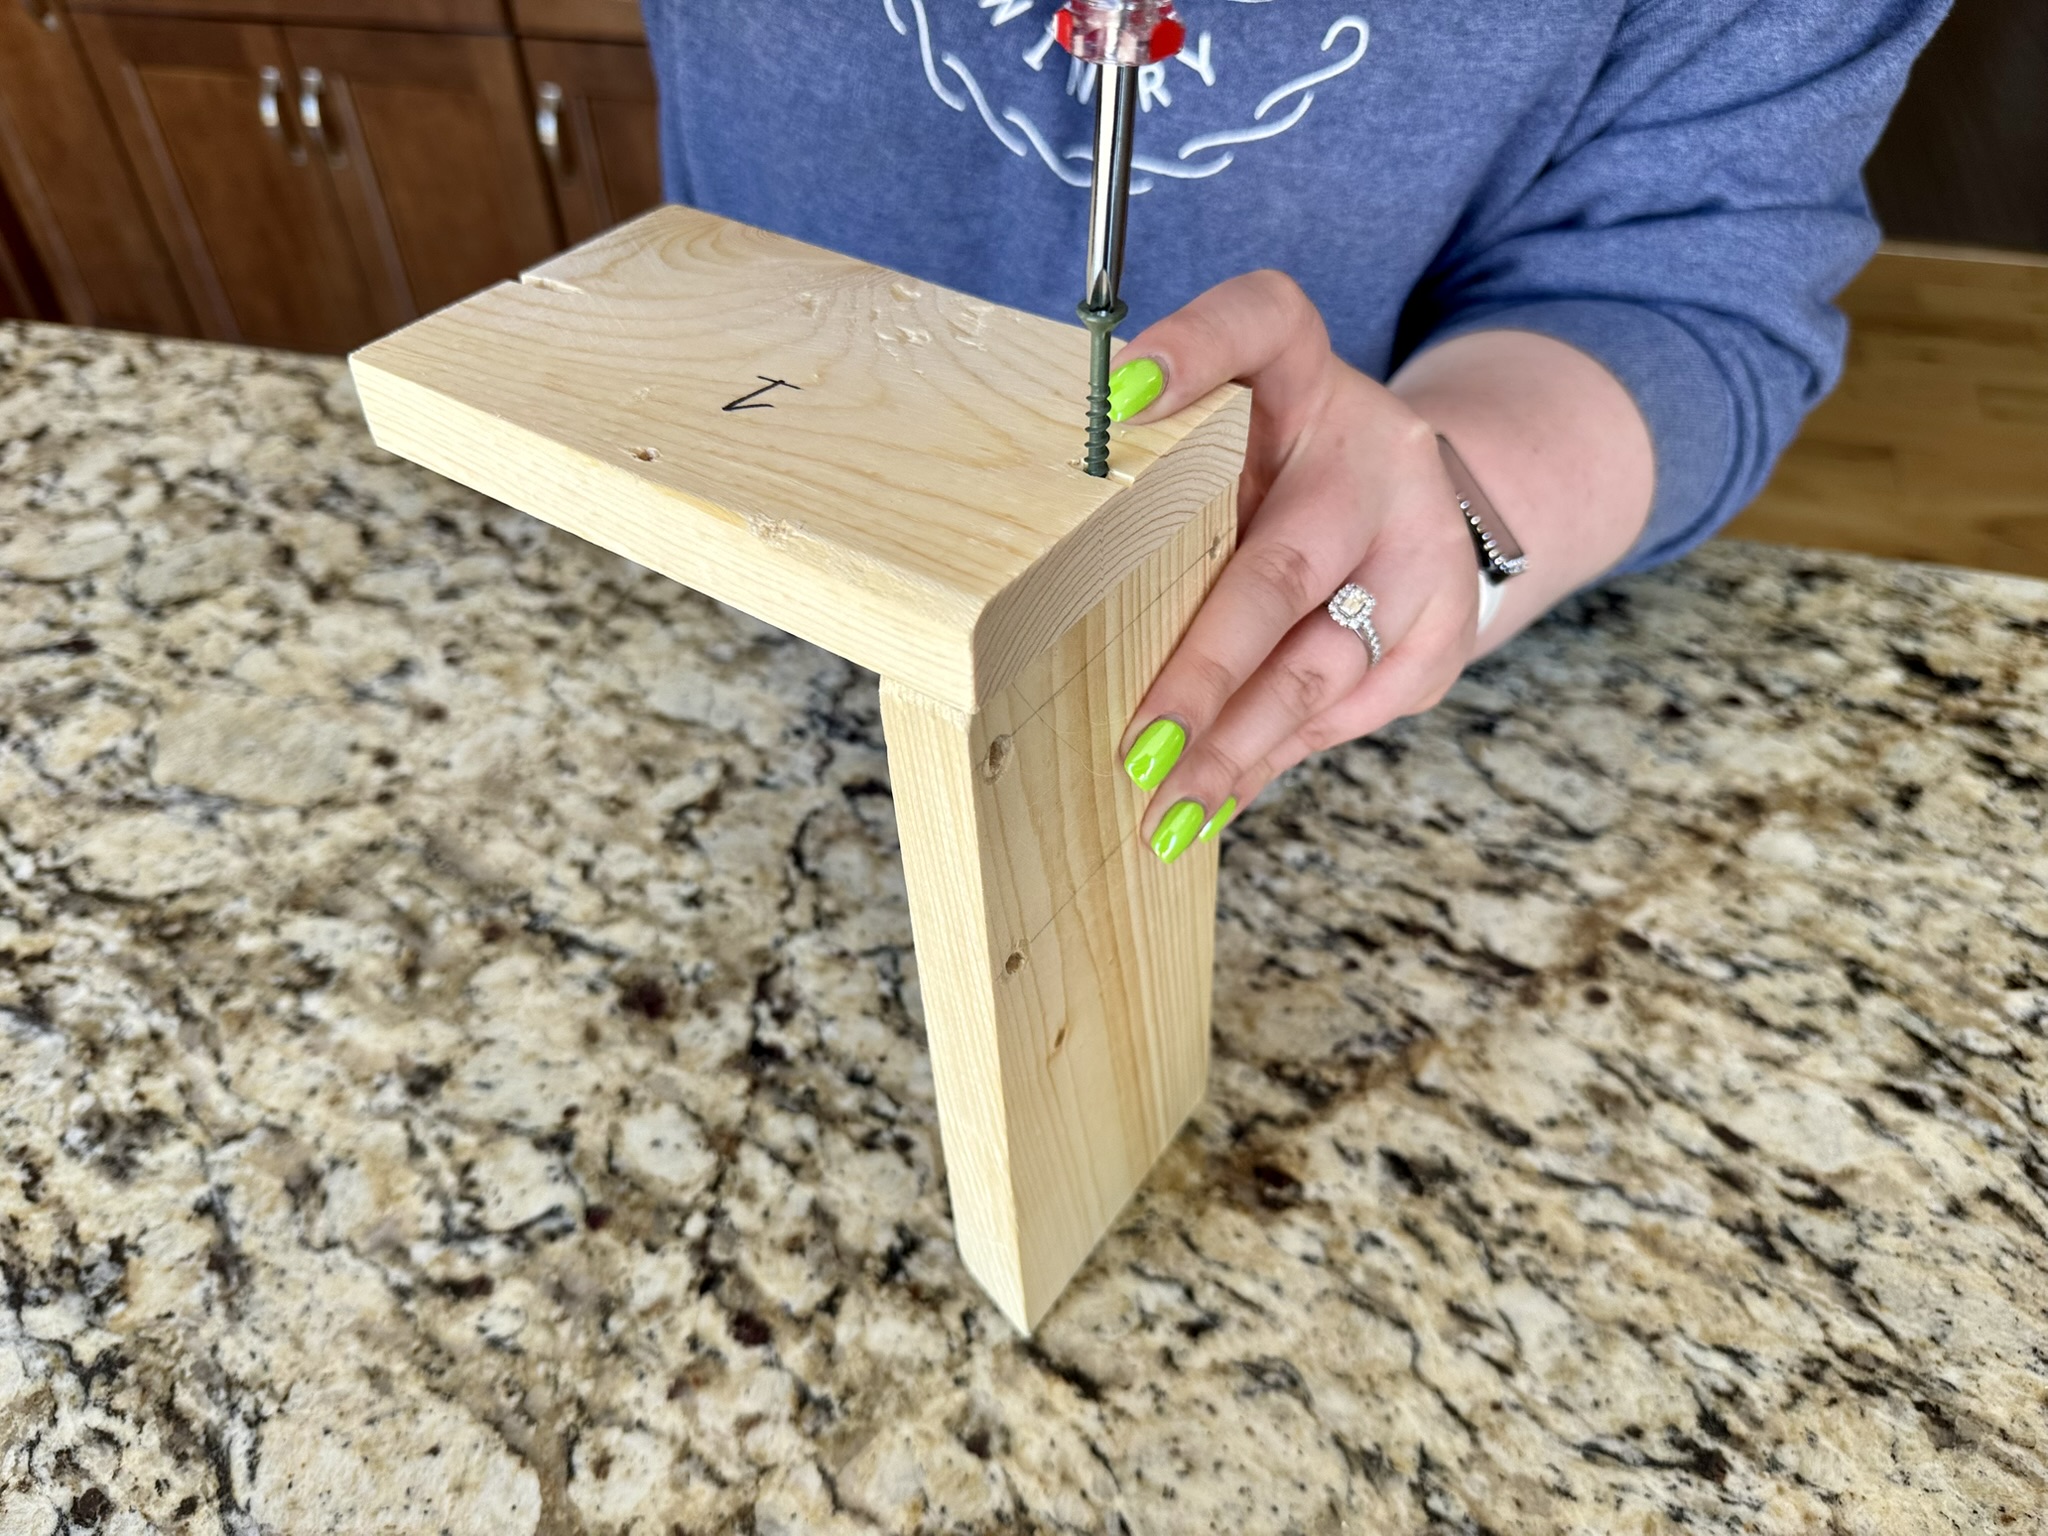
- Grab Piece 1 and Piece 2.
- Line them up just like the picture shows.
Make sure Piece 2 sits flat against Piece 1. - Using the predrilled holes in Piece 1, screw the pieces together.
- Important: The slanted side must face outward, not inward.
Step 2: Add Pieces 3 and 4
- Take Pieces 3 and 4.
- Attach them to Piece 1 using the predrilled holes as your guide.
- Make sure both pieces:
• Sit flat
• Stay parallel to each other
• Match the example photo
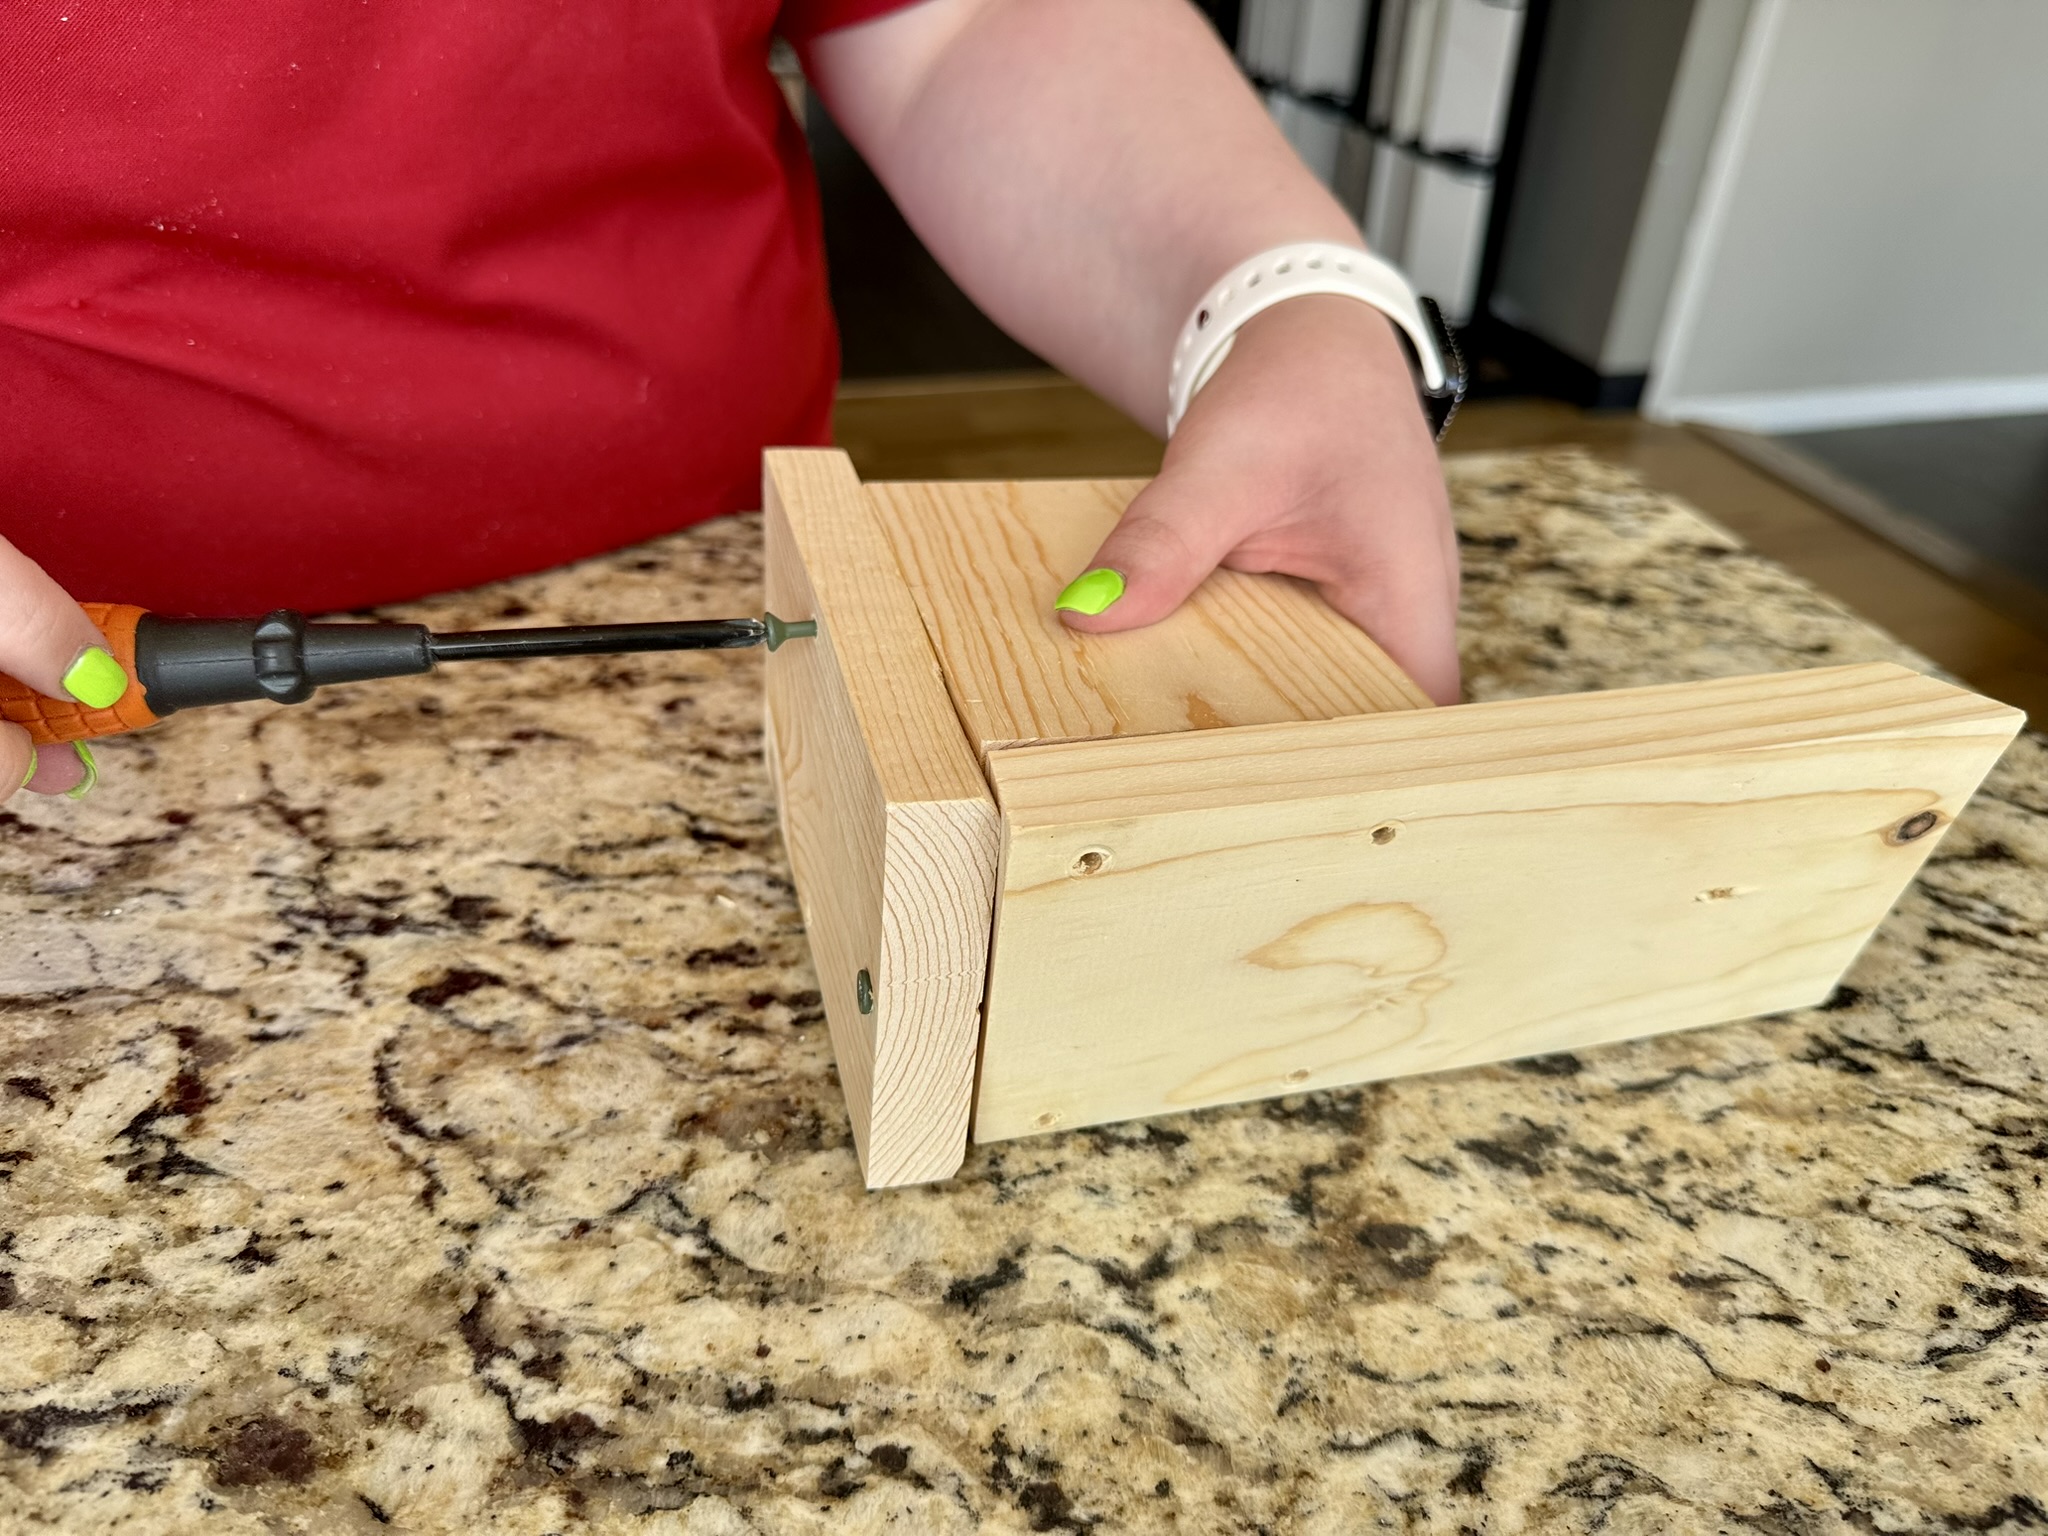
Step 3: Install Piece 5
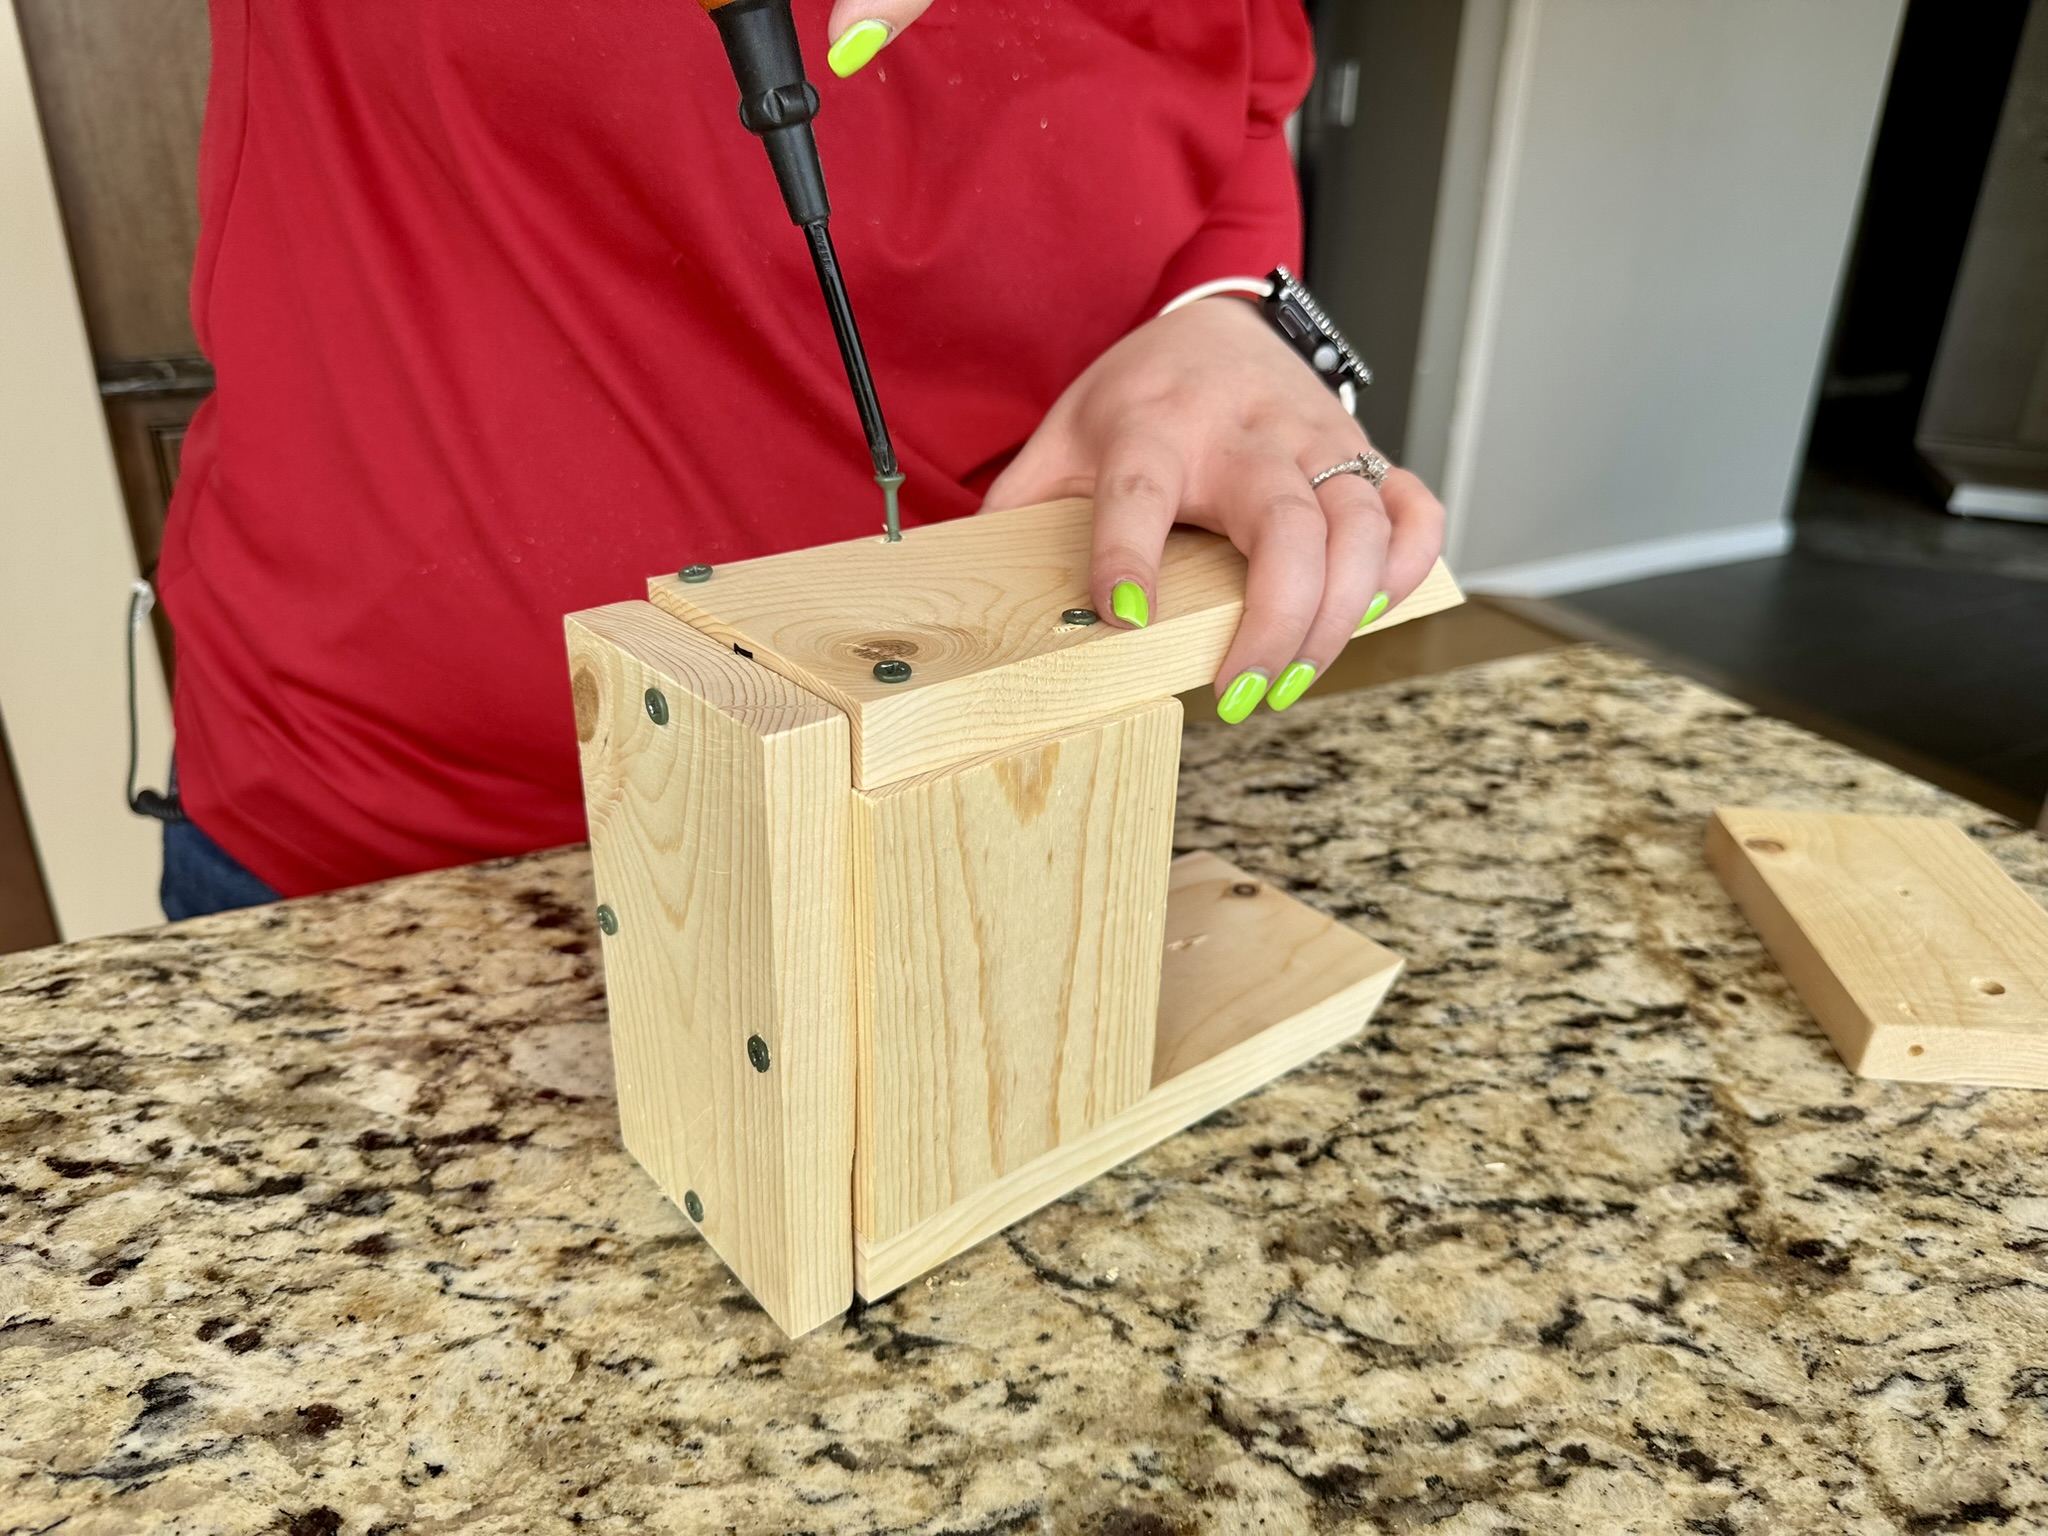
- Grab Piece 5.
- Attach it to Piece 1 using the predrilled holes, following the same method used in Step 1.
- Next, screw through the predrilled holes in Pieces 2 and 5 into Pieces 3 and 4, just like shown in the picture.
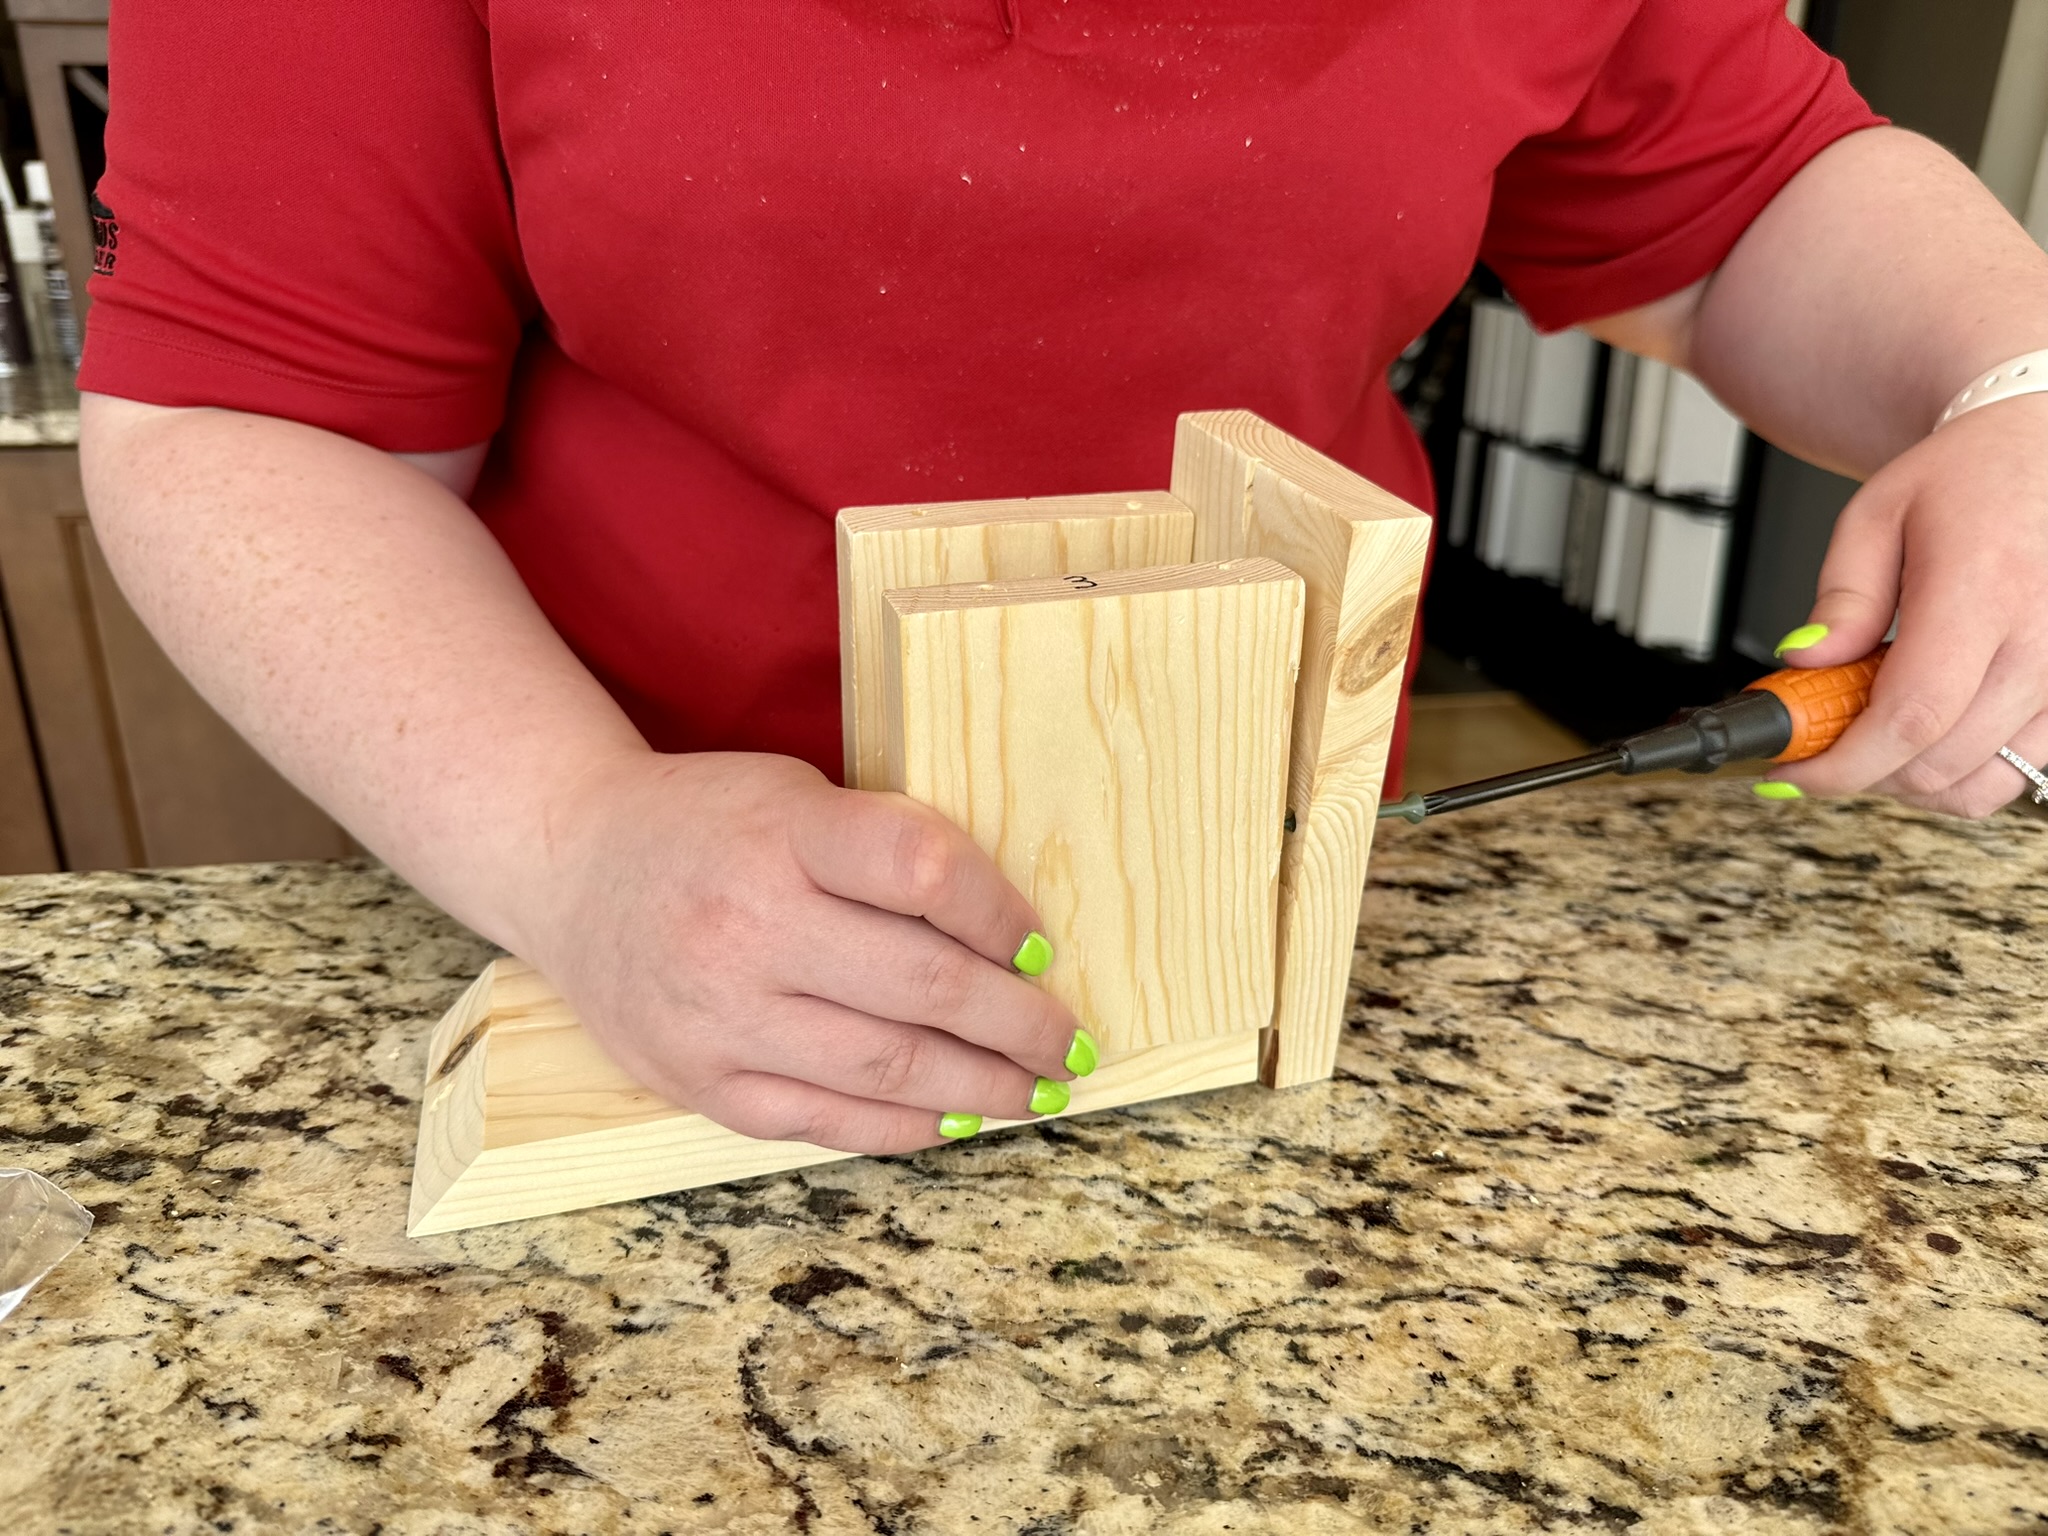
Step 4: Build the Roof

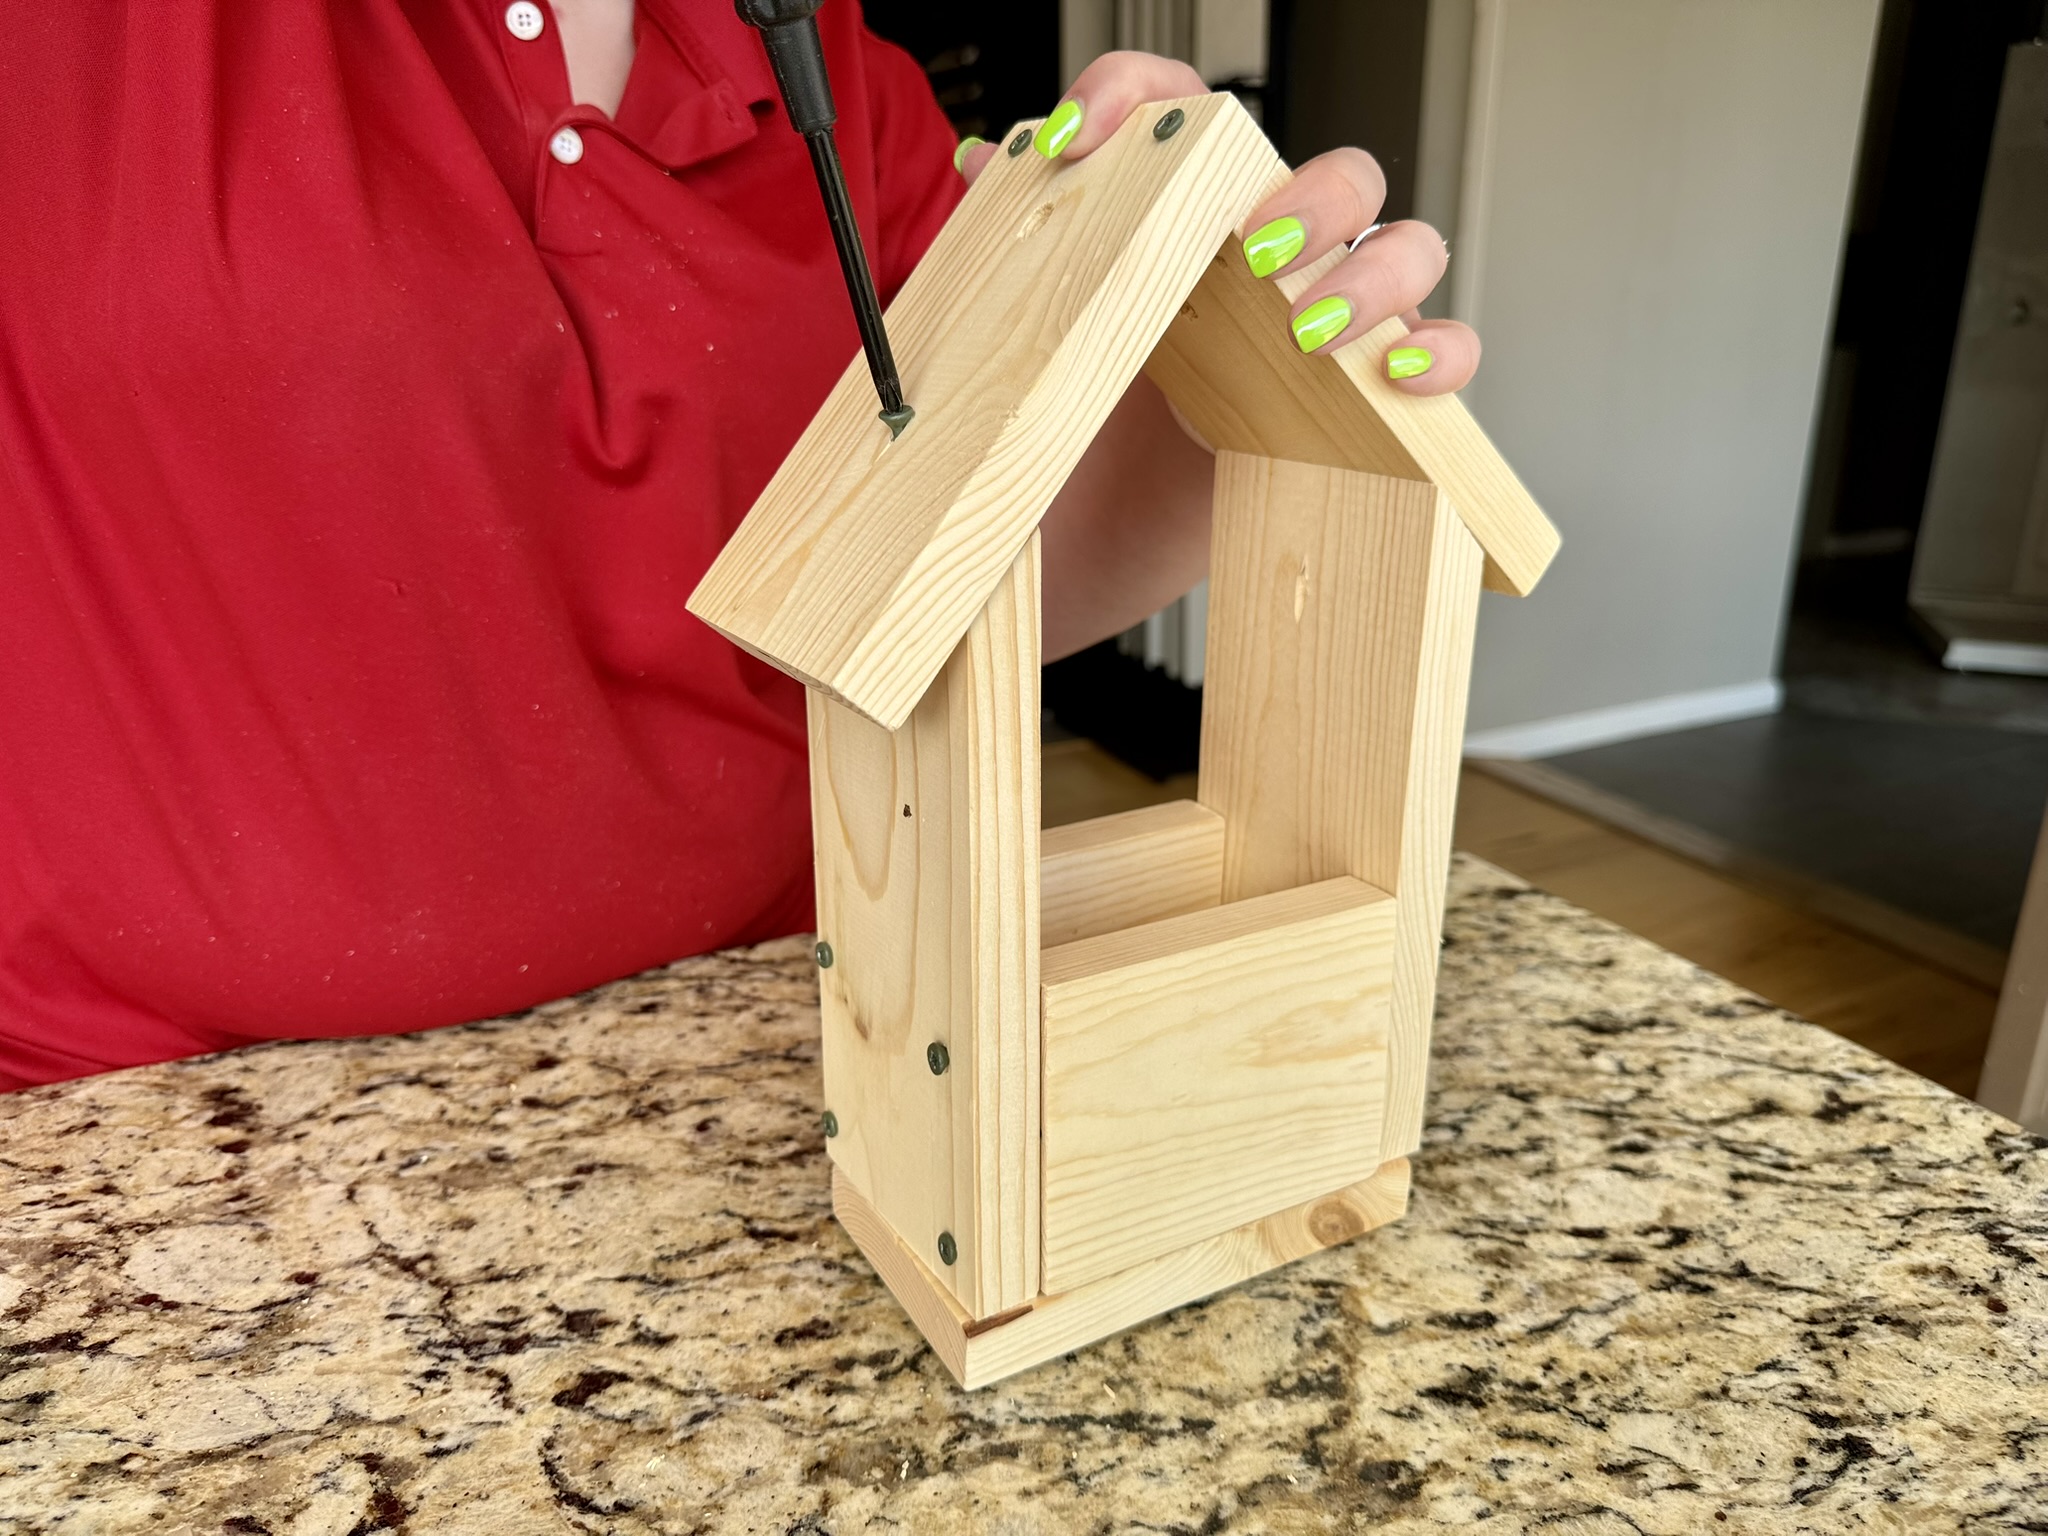
- Take Roof Pieces 6 and 7.
- First, screw Pieces 6 and 7 together using the predrilled holes in Piece 7.
Piece 7 is the larger piece. - Make sure the larger openings face upward.
- Then:
• Attach Piece 7 to Piece 2
• Attach Piece 6 to Piece 5 - Use the predrilled holes in the middle of Pieces 6 and 7.
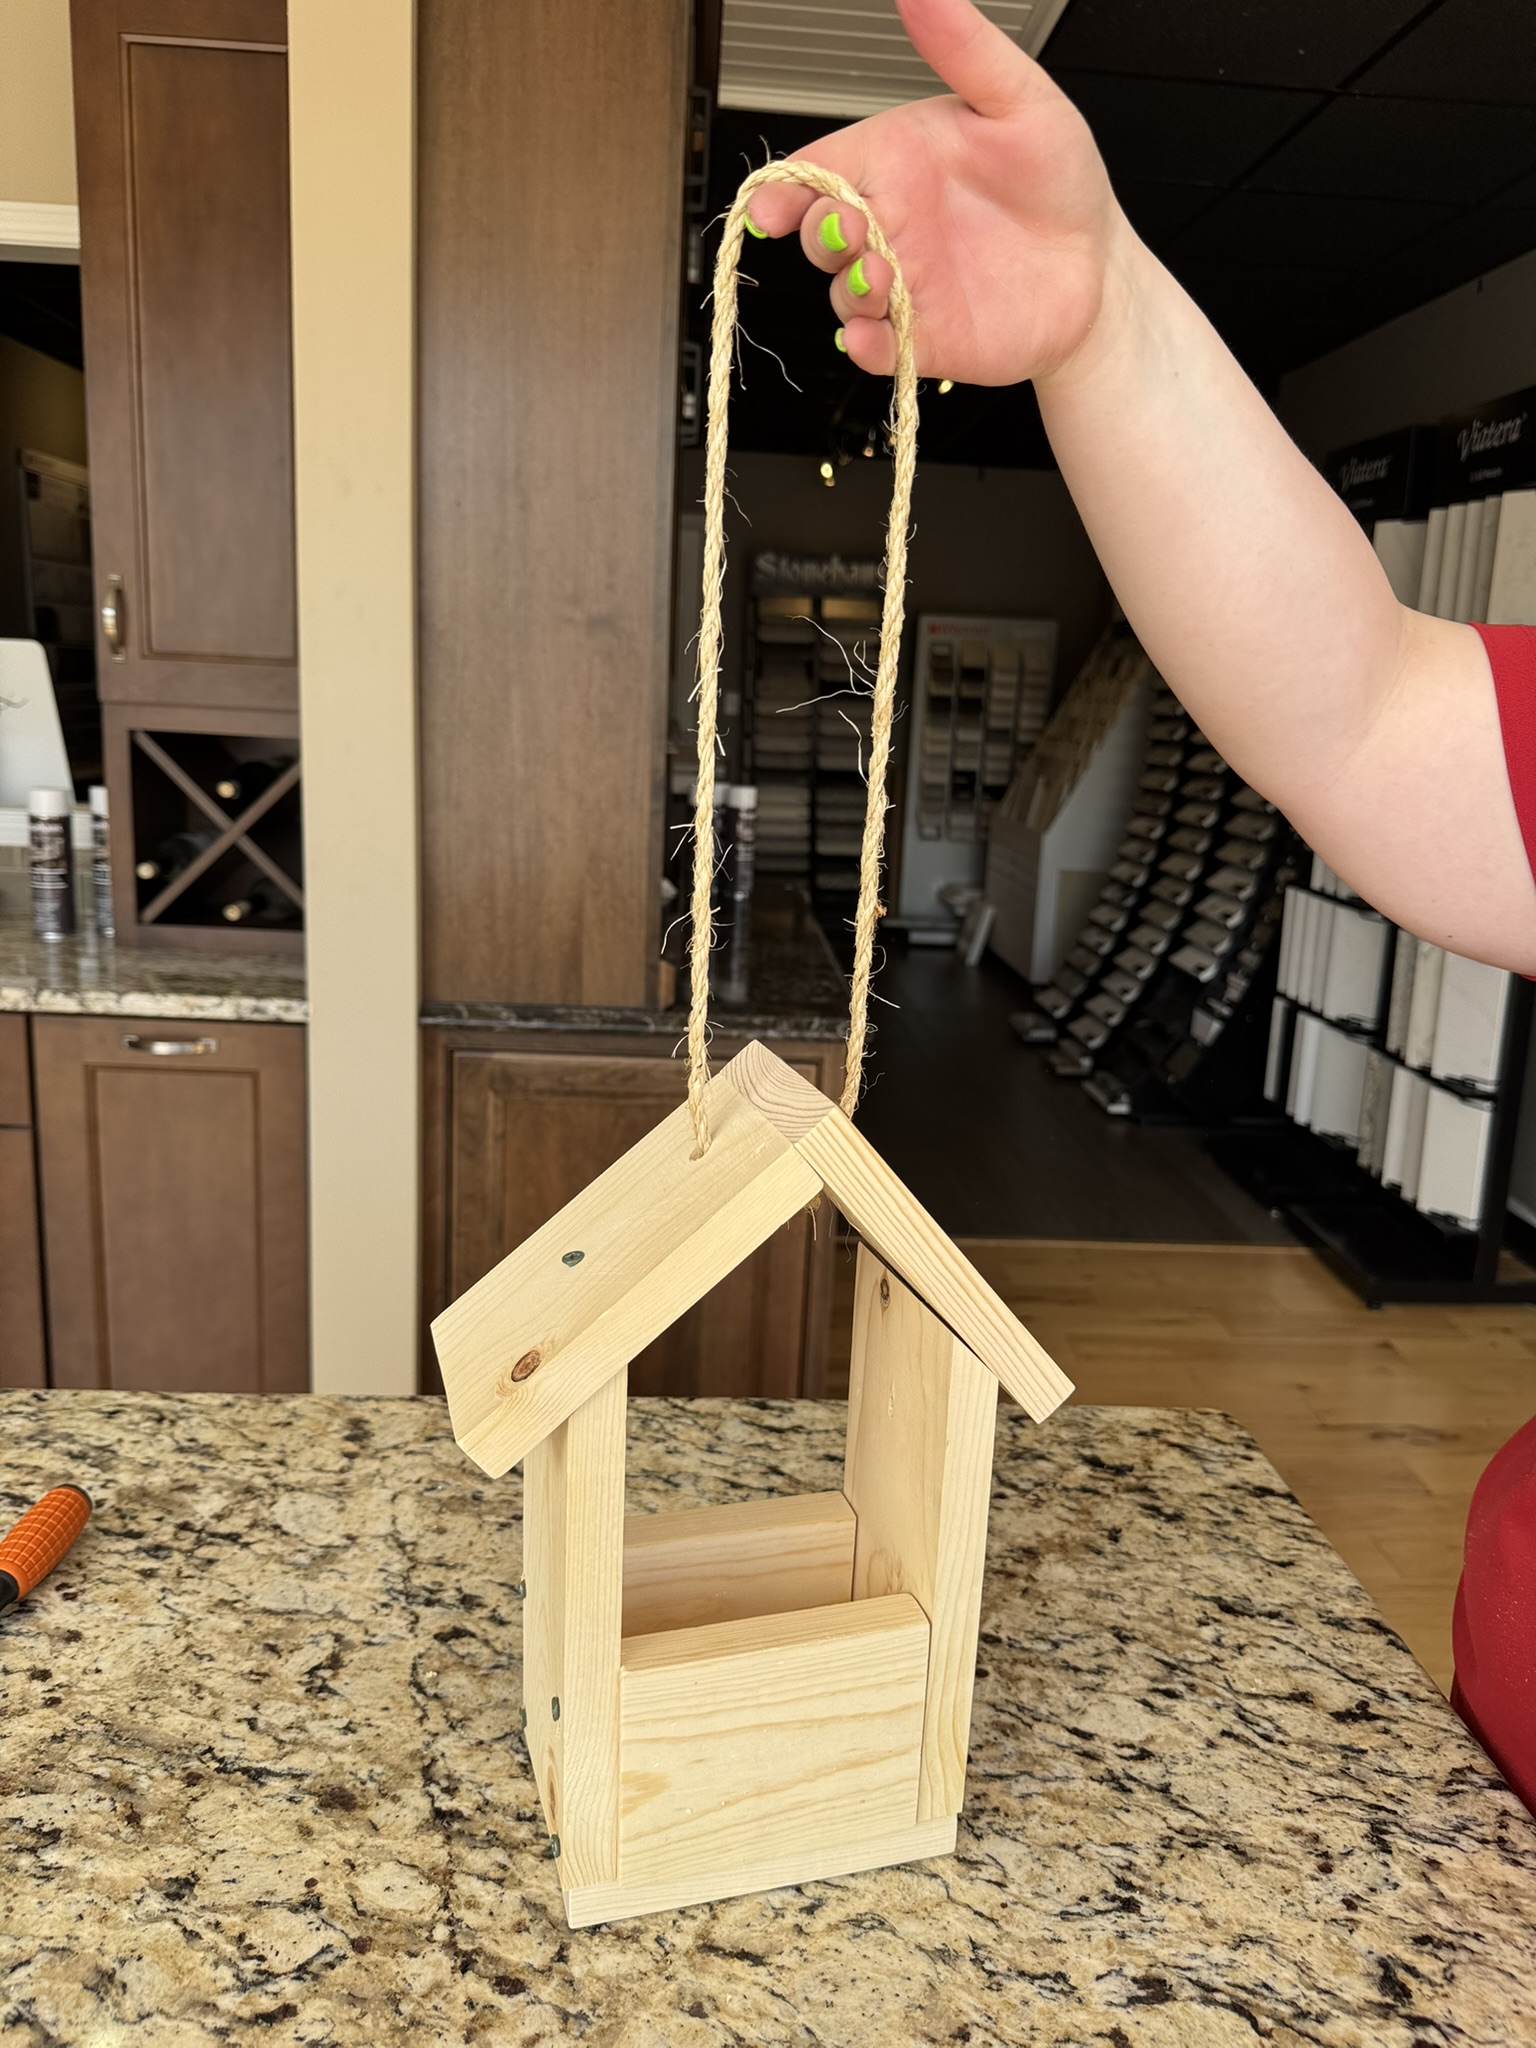
Step 5: Add the Rope
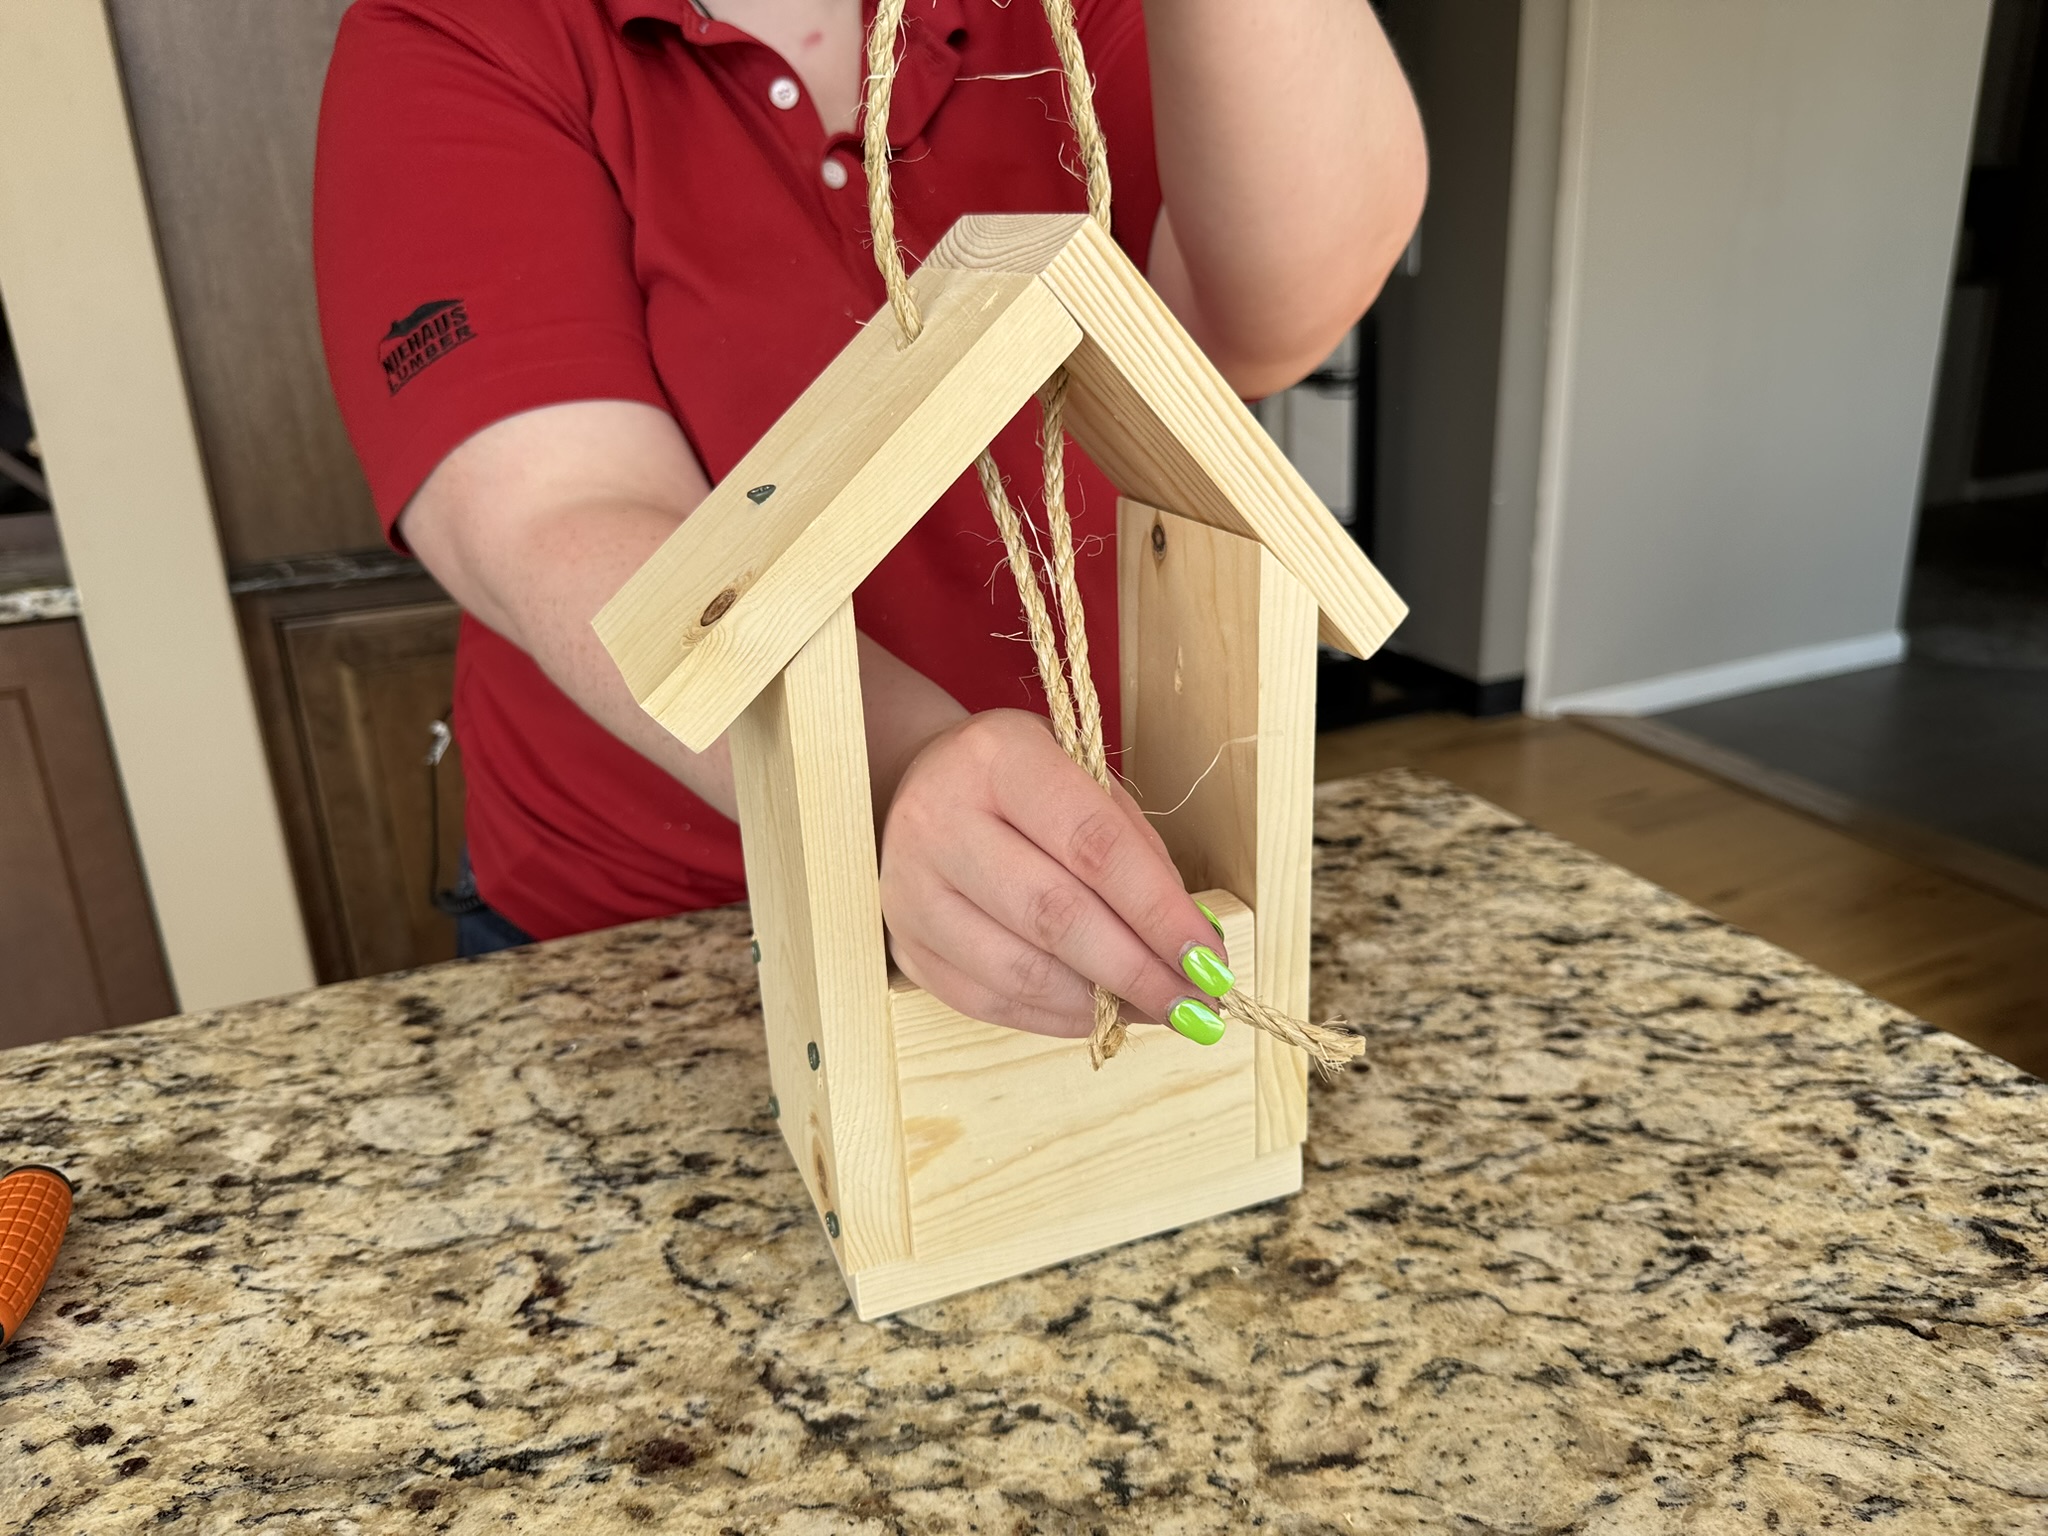
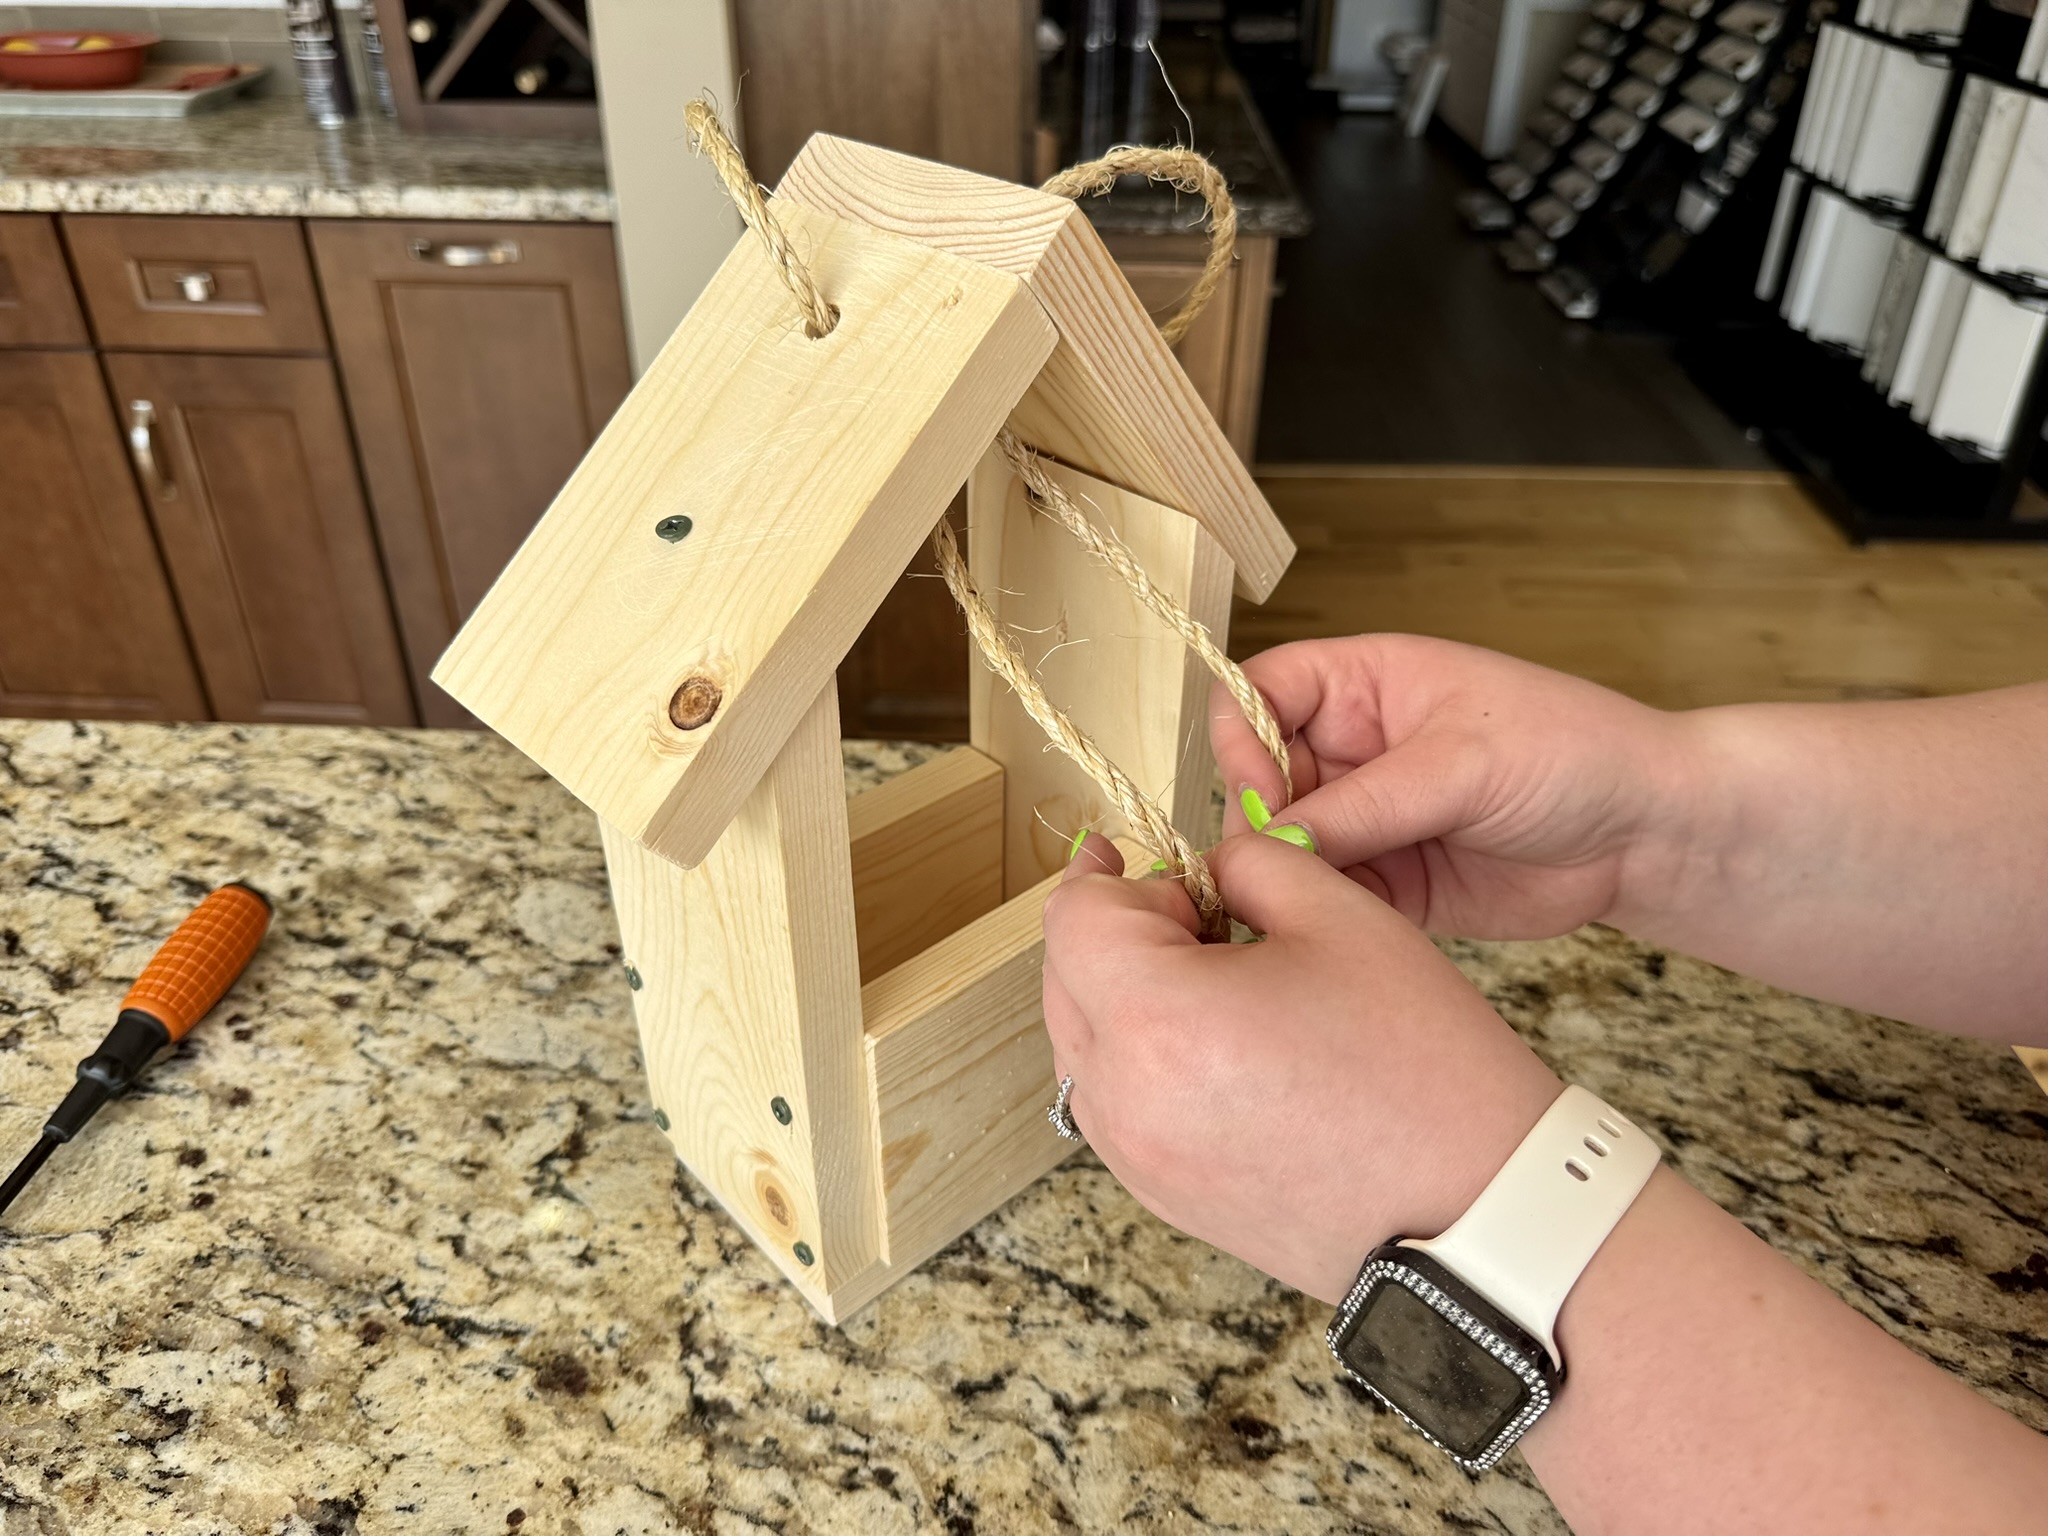
- Now that your frame is complete, grab your rope.
- Thread the rope:
-
- Through one side
- Through the other side
- Then through the middle
- Pull both ends together and tie a knot.
Step 6: Decorate and Plant
- Great job, Builder!
- Now it is time to decorate your planter and plant your flower. Make it colorful and make it yours.
- Have fun creating something you built yourself!
Why Little Builders Matters
Once complete, the wooden planter becomes more than just a finished build. It turns into a meaningful keepsake filled with creativity, effort, and care. Adding a flower and personal decorations makes this project a perfect Mother’s Day gift, allowing young builders to give Mom something handmade that she can enjoy long after the project is finished.
The Little Builders Workshop helps kids gain confidence, learn basic DIY skills, and experience the pride that comes from building something themselves. Parents and children work side by side, creating memories while learning skills that can last a lifetime.
We love seeing creativity come alive in every project, and we cannot wait to welcome more young builders at the next workshop hosted at Niehaus Lumber.
Take Your DIY Planter to the Next Level


At Niehaus Lumber, the Little Builders Workshop is all about giving young builders the chance to learn, create, and have fun while building something with their own hands. Each workshop introduces kids to basic building skills in a safe, hands on environment where families work together and creativity takes center stage.
Project Introduction
The DIY Wooden Planter is a fun, hands on building project that teaches young builders how individual pieces come together to create something meaningful. By assembling the planter step by step and finishing it with flowers and decorations, kids create a handmade piece they can be proud of. This project also makes a thoughtful Mother’s Day gift, giving children the opportunity to build something special and personal straight from the heart.
Materials Needed
Each Little Builder received a project kit that included:
- Precut numbered wood pieces
- (2) 1"x4"x4-1/2" --> Pieces 3 and 4
- (2) 1"x4"x8" w/ slated cuts at 45 degrees in one side --> Pieces 2 and 5
- (1) 1"x4"x6" base Piece 1
- (1) 1"x4"x6" roof Piece 7 w/ large hole.
- (1) 1"x4"x5-1/2" roof Piece 6 w/ large hole
- (16) Galvanized screws
- (1) Rope piece
All materials were prepared ahead of time so kids could focus on building and having fun.
- Pull out all your pieces and lay them on a flat surface.
- Make sure you have every piece before you start. Each board has a number that will help guide you during the build.
- Ask an adult to help you with this project.
Step by Step Building Guide
Step 1: Attach Pieces 1 and 2
- Grab Piece 1 and Piece 2.
- Line them up just like the picture shows.
Make sure Piece 2 sits flat against Piece 1. - Using the predrilled holes in Piece 1, screw the pieces together.
- Important: The slanted side must face outward, not inward.
Step 2: Add Pieces 3 and 4
- Take Pieces 3 and 4.
- Attach them to Piece 1 using the predrilled holes as your guide.
- Make sure both pieces:
• Sit flat
• Stay parallel to each other
• Match the example photo
Step 3: Install Piece 5
- Grab Piece 5.
- Attach it to Piece 1 using the predrilled holes, following the same method used in Step 1.
- Next, screw through the predrilled holes in Pieces 2 and 5 into Pieces 3 and 4, just like shown in the picture.
Step 4: Build the Roof
- Take Roof Pieces 6 and 7.
- First, screw Pieces 6 and 7 together using the predrilled holes in Piece 7.
Piece 7 is the larger piece. - Make sure the larger openings face upward.
- Then:
• Attach Piece 7 to Piece 2
• Attach Piece 6 to Piece 5 - Use the predrilled holes in the middle of Pieces 6 and 7.
Step 5: Add the Rope
- Now that your frame is complete, grab your rope.
- Thread the rope:
-
- Through one side
- Through the other side
- Then through the middle
- Pull both ends together and tie a knot.
Step 6: Decorate and Plant
- Great job, Builder!
- Now it is time to decorate your planter and plant your flower. Make it colorful and make it yours.
- Have fun creating something you built yourself!
Why Little Builders Matters
Once complete, the wooden planter becomes more than just a finished build. It turns into a meaningful keepsake filled with creativity, effort, and care. Adding a flower and personal decorations makes this project a perfect Mother’s Day gift, allowing young builders to give Mom something handmade that she can enjoy long after the project is finished.
The Little Builders Workshop helps kids gain confidence, learn basic DIY skills, and experience the pride that comes from building something themselves. Parents and children work side by side, creating memories while learning skills that can last a lifetime.
We love seeing creativity come alive in every project, and we cannot wait to welcome more young builders at the next workshop hosted at Niehaus Lumber.
Take Your DIY Planter to the Next Level