
.png "DIY Garden Beds: Build Your Own with Lumber from Niehaus Lumber")

DIY Garden Beds: Build Your Own with Lumber from Niehaus Lumber
Spring and summer are the perfect seasons to get your hands in the dirt and bring your garden dreams to life. Whether you're growing fresh herbs, juicy tomatoes, or a full bed of veggies, a raised garden bed gives you control, better soil drainage, and a cleaner backyard setup. In this gui de, we’ll walk you through how to build your own garden bed using quality lumber—an easy project that anyone from homeowners to DIYers can take on over a weekend.
Why Choose a Raised Garden Bed?
Raised garden beds are great for:
-
Keeping weeds at bay
-
Improving drainage
-
Reducing soil compaction
-
Deterring pests and critters
-
Extending the planting season
Plus, they just look great in your yard.
Materials You'll Need
You can adjust the size to your space, but we’ll focus on a standard 4 ft. x 8 ft. x 12 in. deep garden bed:
Lumber:
-
(2) 2 in. x 12 in. x 8 ft. boards (for the long sides)
-
(2) 2 in. x 12 in. x 4 ft. boards (for the short sides)
-
(1) 2 in. x 4 in. x 8 ft. board, cut into (4) 1 ft. corner supports
We recommend cedar or treated pine for longevity.
Other materials:
-
Landscape fabric (optional but recommended)
Step-by-Step Instructions
Step 1: Cut and Prepare Your Lumber

If you didn’t get the boards pre-cut at the store, start by cutting your lumber to size. Use a circular saw to trim your 2x12s to 4 ft. and 8 ft. lengths, and your 2x4 into four 12 in. corner pieces.
Pro Tip: Pre-drill holes in your boards to avoid splitting when you assemble.
Step 2: Assemble the Frame
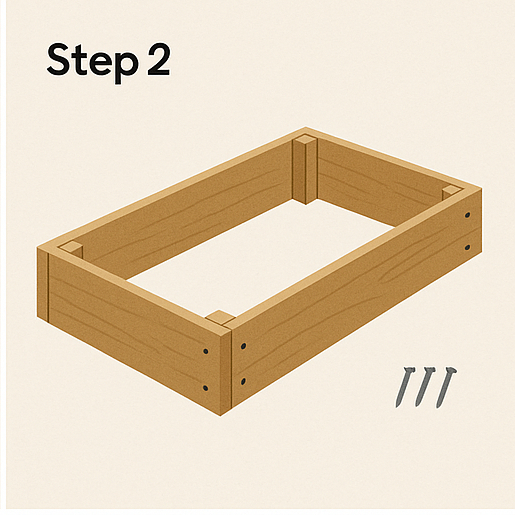
Lay the 4 ft. boards between the 8 ft. boards to create a rectangle. Attach them using 3 in. exterior screws. Use two screws at each joint.
Next, place your 12 in. corner supports flush into each inside corner of the frame. Secure with screws going through both the long and short sides of the box.
This provides extra strength and helps prevent warping over time.
Step 3: Choose Your Garden Spot

Find a level, sunny area of your yard—most veggies need 6–8 hours of sun daily. Set your frame in place and make sure it sits level. Remove grass or weeds beneath if needed.
Step 4: Line the Base (Optional)

To prevent weeds and help with drainage, line the bottom with landscape fabric. Use a staple gun or landscaping staples to secure it in place.
Step 5: Fill and Plant

Now the fun part! Fill your bed with a mix of topsoil and compost—roughly a 60/40 split works great. Level the soil with a rake and get planting!
Final Touches
-
Add a trellis or cage for climbing plants like tomatoes or cucumbers.
-
Consider a coat of food-safe wood sealant if you used untreated lumber.
-
Water regularly and enjoy fresh produce right from your backyard.
Build It With Lumber from Niehaus
Ready to start your garden bed? Niehaus Lumber carries all the treated and cedar lumber, tools, and soil supplies you need to build it right. Visit us in-store or online to get everything for your DIY garden project in one trip.
Get What You Need for Your Next Project!


DIY Garden Beds: Build Your Own with Lumber from Niehaus Lumber
Spring and summer are the perfect seasons to get your hands in the dirt and bring your garden dreams to life. Whether you're growing fresh herbs, juicy tomatoes, or a full bed of veggies, a raised garden bed gives you control, better soil drainage, and a cleaner backyard setup. In this gui de, we’ll walk you through how to build your own garden bed using quality lumber—an easy project that anyone from homeowners to DIYers can take on over a weekend.
Why Choose a Raised Garden Bed?
Raised garden beds are great for:
-
Keeping weeds at bay
-
Improving drainage
-
Reducing soil compaction
-
Deterring pests and critters
-
Extending the planting season
Plus, they just look great in your yard.
Materials You'll Need
You can adjust the size to your space, but we’ll focus on a standard 4 ft. x 8 ft. x 12 in. deep garden bed:
Lumber:
-
(2) 2 in. x 12 in. x 8 ft. boards (for the long sides)
-
(2) 2 in. x 12 in. x 4 ft. boards (for the short sides)
-
(1) 2 in. x 4 in. x 8 ft. board, cut into (4) 1 ft. corner supports
We recommend cedar or treated pine for longevity.
Other materials:
-
Landscape fabric (optional but recommended)
Step-by-Step Instructions
Step 1: Cut and Prepare Your Lumber
If you didn’t get the boards pre-cut at the store, start by cutting your lumber to size. Use a circular saw to trim your 2x12s to 4 ft. and 8 ft. lengths, and your 2x4 into four 12 in. corner pieces.
Pro Tip: Pre-drill holes in your boards to avoid splitting when you assemble.
Step 2: Assemble the Frame
Lay the 4 ft. boards between the 8 ft. boards to create a rectangle. Attach them using 3 in. exterior screws. Use two screws at each joint.
Next, place your 12 in. corner supports flush into each inside corner of the frame. Secure with screws going through both the long and short sides of the box.
This provides extra strength and helps prevent warping over time.
Step 3: Choose Your Garden Spot
Find a level, sunny area of your yard—most veggies need 6–8 hours of sun daily. Set your frame in place and make sure it sits level. Remove grass or weeds beneath if needed.
Step 4: Line the Base (Optional)
To prevent weeds and help with drainage, line the bottom with landscape fabric. Use a staple gun or landscaping staples to secure it in place.
Step 5: Fill and Plant
Now the fun part! Fill your bed with a mix of topsoil and compost—roughly a 60/40 split works great. Level the soil with a rake and get planting!
Final Touches
-
Add a trellis or cage for climbing plants like tomatoes or cucumbers.
-
Consider a coat of food-safe wood sealant if you used untreated lumber.
-
Water regularly and enjoy fresh produce right from your backyard.
Build It With Lumber from Niehaus
Ready to start your garden bed? Niehaus Lumber carries all the treated and cedar lumber, tools, and soil supplies you need to build it right. Visit us in-store or online to get everything for your DIY garden project in one trip.
Get What You Need for Your Next Project!